Goat Cheese, Sausage, and Arugula Stuffed Peppers

Goat Cheese, Sausage, and Arugula Stuffed Peppers

20140322-202648.jpg

Wowza you guys. This recipe is sooooo freaking good. simple. delicious. fresh. healthy. did I already say delicious? Because it is.

It probably doesn’t hurt that I am OBSESSED with Arugula. Something about that taste just gets my every time. Spicy. Nutty. A tiny bit bitter. Loveeee it.

This dish does a great job highlighting those flavors. And it has goat cheese. So, what’s not to like?

Ingredients:

3 medium bell peppers of any color, halved lengthwise, seeds and ribs removed
2 teaspoons olive oil
4 links sausage of your choice, casings removed (I used spicy italian)
1 onion, diced
4 ounces goat cheese, softened or just buy the pre-crumbled stuff
2 large handfuls of arugula (about 1½ ounces) *Rocket for all you non USA folks 🙂
Salt, pepper and/or red pepper flakes, to taste
1/4 cup  freshly grated Parmesan (or mozzarella)

Instructions:

Turn on oven to 400º. Place the prepped peppers in a baking dish and set aside.

Heat olive oil in a medium skillet set over medium-high heat. Add the sausage and cook until it browns, crumbling with a wooden spoon as it cooks. Drain the sausage and return to heat. Add the onion and cook until softened. Reduce heat to low and stir in the arugula and goat cheese until the cheese has melted and the arugula is wilted. Taste and add salt, pepper and red pepper flakes.

Spoon the filling into the peppers and sprinkle each half with Parmesan. Bake for 12-15 minutes, until the peppers have softened slightly. Hit with the broiler for about a minute to get the golden cheese on top and serve!

20140322-202603.jpg

I tried some with and without cheese on top

So I tried baking both with cheese on top and without. Honestly, the cheese sort of helped hold everything together but it’s one million percent possible to make this without the extra cheese on top. Just as delicious, just slightly messier.

20140322-202729.jpg

so pretty too!

Hmmmmmmm seriously sooo delicious. This meal was so quick to make and the flavors were aaaaaammmazing. I could have eaten the pepper “stuffing” by the spoonful out of the bowl.

Ok, I did that.

Don’t judge. It was soooooo good. You could serve this as a side or meal by itself! You need to make this pronto!

Also I just wanted to share that I’ve created some social media pages dedicated to the blog, check us out on Twitter and Facebook!

Thanks!

xoxo

669058772380712020613

Sausage & Cheese Tortellini

Sausage & Cheese Tortellini

20140323-130818.jpg

Hi friends! And a special shout out to all the moms on Mothers Day! ❤

This is one of those recipes that was written for the slow cooker but as I’ve stated before those don’t fit into my life that well. So I transposed this, if you will, to be made in a fraction of the time on the stovetop!

Turned out great. And it’s really a fast thing to make, especially when you can buy those pre made tortellini’s  in the store. Life savers for a busy mom. I’m  not a mom but if I appreciated how fast this one was to make, I’m sure moms do to0 🙂 And the basil added at the end gives this a real boost of fresh flavor.

Ingredients: 

  • 3 cups chicken broth
  • 1 20 oz package of your favorite tortellini
  • 1 lb  Italian sausage
  • 2 Cans Diced Tomatoes (I used the ones seasoned with basil, garlic & oregano)
  • 4 oz. Neufchâtel Cheese (Or cream cheese)
  • Grated Parmesan Cheese
  • Fresh Basil

Instructions: 

1. Take your Neufchâtel out of the fridge, and let it sit and soften a bit while you brown your sausage in a large pot.

2. Drain your sausage once it’s cooked and add the tortellini to your pot. Pour the tomatoes with liquid and all, and broth over the top. Add your cream cheese to the pot in chunks.

3. Give it a good stir to get everything evenly distributed, making sure the liquids are adequately covering the tortellini.

4. Cook uncovered on med-high head for a total of about 30 minutes or so or until your tortellini is cooked and your sauce has thickened a bit.

5. Pour into individual bowls and top with basil and cheese if desired.

Sooooo simple and tasty! Hope you like it as much as we did.


xoxo

669058772380712020613


Roasted Veggie & Black Bean Burritos

Roasted Veggie & Black Bean Burritos


Heyyy-o! It’s fridayyyy friiiidaaay (you’re welcome that song is now stuck in your head). But seriously I pretty pumped that it’s the weekend! The weather is starting to look up around here (high of 66 today!) and I am visiting a old roomie from my college days tonight. Life is good.

I was browsing through my dashboard (basically like the settings portal of my blog) here on WordPress and saw that I didn’t ever publish this recipe! I made a quite a while ago and it was deeelcious but must have spaced on the publishing part.

This would also work great as a gluten free option to just make the “stuffing” part of the burrito and put it over rice or or quinoa or any grain you want etc…

Hope you enjoy this tasty meal and also the helpful burrito rolling tip below 🙂

INGREDIENTS:
2 whole Sweet Potatoes, peeled And cubed small
2 whole Jalapenos diced
1 whole Red Pepper, diced
1 whole Red Onion, diced
2 teaspoons Olive Oil
1 teaspoon Cumin
1 teaspoon Chili Powder
1 pinch Salt And Pepper
2 cups cooked Black Beans (or 1 15 oz can rinsed and drained)
½ cups Fresh Cilantro, chopped
2 teaspoons Fresh Lime Juice
1 cup Shredded Cheddar
1 package Burrito-Sized Wheat Tortillas Or Wraps (6-10 Count) but really any tortilla will work.

INSTRUCTIONS:
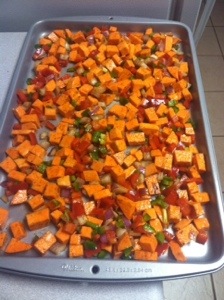
In a bowl, toss your raw veggies in olive oil and season with spices. Place in a large baking dish and roast in 425 degree oven for 20 minutes, tossing around halfway through.
20131215-213855.jpg

Let cool. Add your roasted veggies to a cans worth of rinsed black beans. Add cilantro and squirt of fresh lime juice. Combine gently. At this point, mixture can be stored for later use if want to make this part ahead of time.

20131215-213906.jpg

Warm your tortillas of choice in microwave for about 30 seconds (so they are easier to handle and roll). Spray a casserole dish with nonstick spray or olive oil spray.
Add few heaping spoonfuls of vegetable and bean mixture to center of wrap. Top with shredded cheese. Fold in sides, and then roll up to complete(see pic below).Place in pan and continue to roll the others. Place into your baking dish, seam side down so that they stay together.
Bake in 375 degree oven for about 15 minutes or until golden brown. Baking this way will make the tortilla wrap crisp. It’s up to you if you want to sprinkle with cheese or not, I just thought it would look a little ‘prettier’.

** Tip: Premake your burritos and wrap them in aluminum foil. Keep in refrigerator for 3-4 days for a quick lunch or dinner!

Burrito Rolling 101:

20131215-213916.jpg

This is how my mom taught us to roll up our tortillas. I have been doing it this way since before I can remember. It blows my mind to see people do it any other way. I mean your “stuffing” is falling out all over the place and you, more likely than not, end up with food all over you! All I do is fold in the sides of the burrito like the the top left picture and then roll up(tucking in the ‘insides’ while you go) to complete it! Super simple and it all stays inside.

Hope you guys enjoy this one. It is a healthy, filling, tasty dinner!

xoxo

669058772380712020613

Chicken Lettuce Wraps

Chicken Lettuce Wraps

20140322-200507.jpg

These little guys are a fast and healthy dinner for a family on the go. Don’t let some of the ingredients scare you! They come together for a delicious combination. These would be great in tortillas if you’d prefer but the crisp lettuce sort of ‘makes’ this dish. It’s healthy and crunchy and allows for you to really taste the chicken mix. I was inspired by PF Chang’s lettuce wraps which are so good! I didn’t have any of those crunchy fried noodle things they serve or any of their sauces. I doused mine in Siracha, because as I think I’ve mentioned before….. I have an addiction.

I had the lettuce wraps at PF Changs for the first time this past fall (I don’t get out much). I loved them. I was doing my normal activity of browsing Pinterest(shocking, I know) and came across a couple of “copy cat” recipes. A lot of them were terrible. Just from reading the ingredients I could tell that was NOT was PF’s was serving up. I sort of adapted a few of them and came up with this. It’s pretty darn close, I think!

Here’s my recipe!
Ingredients
  • 1 tablespoon sesame oil
  • 1 pound ground chicken or turkey
  • 1 large onion, chopped small
  • 2 tablespoons garlic, minced or pressed
  • 1 tablespoon soy sauce
  • 1/4-1/2 cup hoisin sauce
  • 2 teaspoons fresh ginger, minced small
  • 1 tablespoon rice wine vinegar
  • 3 teaspoons sriracha sauce
  • 1 can (8 ounces) sliced water chestnuts, drained and finely chopped
  • 1 small bunch green onions, sliced
  • 1 teaspoon sesame oil
  • Iceberg, or butter lettuce leaves, rinsed and drained
  • Sriracha sauce, wasabi, spicy mustard sauce for dipped (optional)
  • Roasted peanuts, chopped (optional)
  • Fried bean noodles (optional)
Directions
  1. In a medium skillet on medium heat, warm 1 tablespoon sesame oil. Add the ground meat and cook until it is cooked through. With a spatula, break it up into small chunks as it cooks (it will resemble ground beef).
  2. Stir in the onion, garlic, soy sauce, hoisin sauce, ginger, rice wine vinegar, and sriracha sauce until completely coated. Remove from heat.
  3. Fold in water chestnuts, green onion, additional sesame oil. Salt and pepper to taste.
  4. Serve wrapped in a leaf of lettuce. Top with any of the optional additional toppings.
20140322-200531.jpg

I’m fully aware this looks like a turd. But I promise it doesn’t taste like one.

Give it a try and hopefully you like too! I know these aren’t the greatest pictures but it is SUPER delicious and healthy!!

xoxo

669058772380712020613

Fresh Veggie Greek Pasta

Fresh Veggie Greek Pasta

Ahhh, look how pretty this one is. Screams summer time BBQ to me.

20140323-125954.jpg

NEWS FLASH-I live in Wisconsin (ps. GO BUCKY!)

NEWS FLASH- it’s basically April and it snowed last week……

NEWS FLASH- I’m freaking sick of it!

I was desperate for something that tasted like summer and I came across this recipe.  It seemed so fresh tasting, and it was. 🙂

I made a dinner out of this and topped it with some chopped up chicken breast. We ate it warm. But I believe the recipe was originally intended to be a cold pasta salad. Like the ones you bring to SUMMER barbeques with friends when you wear shorts and tank tops and can sit outsiiiiiide and enjoy a cold beverage and possibly see some lightening bugs…ahhhhhh the good times. CAN. NOT.WAIT.

Anyway, we both really liked this dish. It was also a mini-milestone for me beeeecccaauuuse it contains kalmata olives and my Beau ate them! OK – he sort of picked around them while serving and it’s not like he said “these taste GREAT!” but after you hear this story you’ll realize why I’m so happy.

Jake and I have been together for about 6 and a half years. We met in college. Around our 1 year anniversary I decided to make him dinner. Back then it was a rare occurance as we lived in dorms or college housing and no access to a kitchen and we’re poor so there’s that. ANYWAY I choose to make a dish my mom always made called Medditeranean Chicken. Super simple and tasty. Basically 4 ingredients. Chicken breasts, cherry tomotoes, capers, kalmata olives- and then baked. Looking back, I have NO idea what I was thinking. Jake didn’t grow up eating as many diverse flavors as me and his palate was a little, limited shall we say. This was just too much.

Here’s the down and dirty version: I cook. I plate. We sit down. I take a bite=heaven. Jake takes a bite= run to bathroom, spit out food, brush teeth, gargle with Listerine immedietly.

How we are together to this day you ask? I don’t know. My feelings were so hurt but I tried to understand that it was “weird flavors!” for him. Anyway at the time, he pointed to the capers as being the death of him but after that it was both olives and capers that I had to hear about how he dispised them everytime they were in a 5 foot radius of him. I’m taking this dish a sign that almost 5 years later his palate has grown and adapted and they can slowly become part of our grocery repitiore.

But enough about me- Here is how you can make this deeeelicious recipe for you and your family!

Ingredients:
2-3 large tomatoes, seeded and chopped
½ cup Kalamata olives, pitted and chopped
½ cup feta cheese, crumbled
2 tablespoons chopped parsley(I prefer Flat Leaf Italian)
1 tablespoon chopped basil
¼ teaspoon salt
¼ teaspoon black pepper
1 pound penne pasta (or whatever pasta you want)
6 tablespoons olive oil
3 teaspoons garlic, minced

Instructions:
– In a large bowl, combine the chopped tomatoes, olives, feta, herbs and spices, salt and pepper. *If you want to serve this dish cold, you could add this mixture to the fridge at this point to chill
– Cook the pasta according to package directions. Drain in a collander.
– In the same pot, (with the pasta in the collander) heat the olive oil over medium-low heat. Add the garlic and cook, stirring, for 1-2 minutes without letting it turn brown and cripsy.
– Put the pasta back into to the pot and toss with olive oil mixture.
– Add the tomato-olive mixture and toss until the fresh vegetables are thoroughly mixed with the penne.
– Serve!

20140323-130018.jpg

Hope you enjoy! And I also hope the weather is warmer by you, but if it is please don’t tell me about it. I’m bitter, however I can’t complain tooooo much as it’s about 50 today. SPRING IS COMING!

Thanks for vewing !

xoxo

669058772380712020613