Gnocchi w/ Browned Butter, Pancetta, & Sage

Gnocchi w/ Browned Butter, Pancetta, & Sage

5Well as you are about to see, this is NOT by any means a low fat recipe. But I assure you it is by EVERY means, delicious.

I mean letzzzz get real. Butter, pancetta, sage, are there flavors more comfy cozy for fall? Nope!

I had a lot of leftover sage from a butternut squash soup (maybe coming to the blog later?) recipe that I had made and needed to use it up. Butter and pancetta sounded like the perfect accompanists for it so I threw them all together and came up with this deliciously rich quick dinner.

Even while eating it Jake said, “Oh man, this is delicious. This isn’t very healthy for me is it?”

But sometimes I think we should just enjoy the flavors and not worry about “healthy” vs. “unhealthy”. Which is exactly what we did. Enjoyed it and savored it and savored it some more.  1ALWAYSSUMMER (1)3

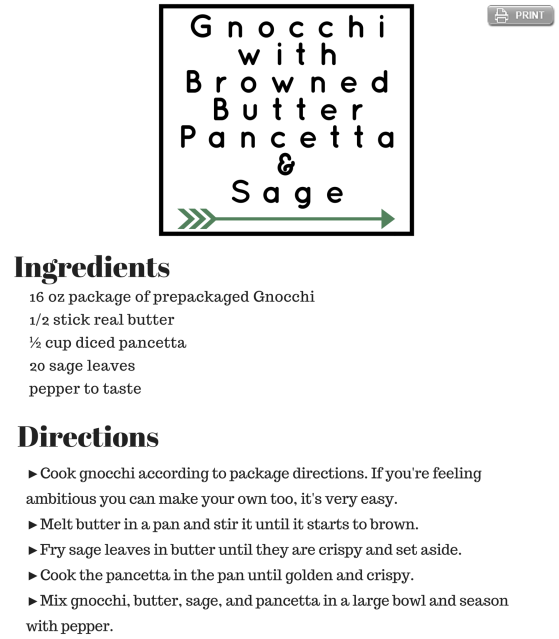
I really love the prepackaged Gnocchi that Cost Plus (World Market) has. It’s cheap, not full of any weird or unpronounceable ingredients and tastes delicious. You can even order it online if you’re not lucky enough to have a store close to you. And I say lucky because I’m convinced that they cannot produce or sell an item I wouldn’t be thrilled to have either in my home, in my stomach or on my body (home decor, food, jewelry/clothes in case you were confused) 🙂 4
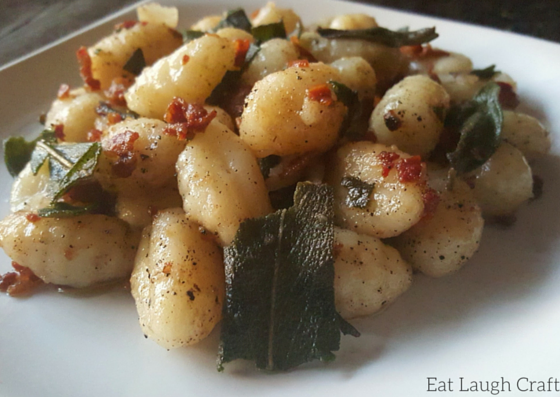
Pancetta and bacon are very similar. Basically the same except for one small step. Both are usually cured pork belly but while pancetta is done after the curing step, bacon is then smoked afterwards. Typically it’s a cold smoke and it’s never heated, which is why both pancetta and bacon need to be cooked before eaten. (Different from prosciutto which has been cured a little differently and for a much longer period of time and can be eaten without being “cooked”). There’s your food lesson for the day!
2We have our first snow fall in the forecast for this weekend. I suppose can’t be that bent out of shape about it, we’ve had such a mild fall and it’s almost the end of November. Maybe if we get enough this year, I can finally go snow shoeing as we couldn’t last year!

xoxo669058772380712020613

Roasted Brussels Sprouts & Butternut Squash

Advertisement

Morel Mushroom Risotto

Morel Mushroom Risotto

EDIT of DSC_8358So maybe I’m just desperate for Spring to get here but I was craving morel mushrooms! Usually early spring is Morel Mushroom season in Wisconsin but they were pretty late popping up around here last year due to winter that lasted into April………………………………….but they eventually did arrive! Hopefully I won’t have to wait quite as long this year!

Usually if we have a season where we have a LOT of them, my family will dry them or dehydrate them put them in a jar and we can enjoy them all year long. It’s simple to use them once they are dried- you basically just cover them with boiling water for about 10 minutes and let them reconstitute. This recipe can use both fresh or dried morels. If you use the dried, you use some of the liquid used to reconstitute the mushrooms as liquid in the risotto and it’s to.die.for. Seriously, love it.

If you’ve never tried morels you should! They look a little funky but trust me, they’re delicious! Now I understand that if you don’t live where they may grow wild they can be pricey (like $30/pound) so I give you permission to use any mushrooms you want for this one 🙂 but if you can, try the morels!

Ingredients: 

  • 1 quart stock, chicken stock or vegetable stock
  • 2-3 cups water
  • 2 tablespoon butter
  • 1 cup minced shallot, leek or onion
  • 2 garlic cloves, minced
  • 2 cups risotto rice (Arborio Rice)
  • 1/2 pound fresh morels, or 1 ounce dried
  • Salt
  • 2 tablespoons chopped chives or parsley
  • 1/2 cup grated pecorino or parmesan cheese

 Instructions: 

FOR FRESH MORELS

  1. Pour the stock and 2 cups water into a pot and bring it to a gentle simmer.
  2. In another medium pot, heat the duck fat or butter over medium-high heat and saute the minced shallot or onion until it softens and turns translucent, about 3-4 minutes. Add the garlic cloves, the morels and the rice and mix well. Cook for 3-4 minutes, stirring often.
  3. When the liquid from the morels has evaporated, add 1/2 cup of hot stock to the rice and stir well. Sprinkle a little salt over everything. The key to making a great risotto is to constantly stir, or at least stir every minute or so. As each 1/2 cup of stock is absorbed, add another, then another until the rice is cooked through, but still firm.
  4. When you reach that point, add the grated cheese and a little more stock. Stir to incorporate the cheese into the risotto. Add the chopped chives and serve at once.

FOR DRIED MORELS

  1. Start by setting the morels in a bowl. Pour 2 cups of boiling water over the morels and cover the bowl. Let the mushrooms steep for 30 minutes to 2 hours. Remove the mushrooms, squeeze them dry with your hands over the bowl, catching the juices. Chop the morels and set aside. Strain the soaking water through a paper towel set in a colander; you will be cooking with this soaking water, and you want it free of debris.
  2. Now follow the directions as above, but instead of 2 cups of water, use the 2 cups of the mushroom soaking water.

EDIT of DSC_8367

TA DA! First of all, I loveeeeee risotto. So creamy and delicious and rich and did I say delicious already? Ahhhhhh. Now I’ve seen “cheaters” risotto out there where you don’t stir so much and you don’t add the liquid bit by bit, but personally I think the labor of love is soooooooo worth it, so I’ve never tried those. If this is your 1st time making a risotto, you’re probably going to think at some point…”um what? no way is all this liquid going in here” but it does! And the result is amazing.

So there you have it and fantastic weekend meal to try! Let me know how yours turned out! I love hearing from my readers! HAPPY WEEKEND!

xoxo

669058772380712020613

Sausage & Cheese Tortellini

Sausage & Cheese Tortellini

20140323-130818.jpg

Hi friends! And a special shout out to all the moms on Mothers Day! ❤

This is one of those recipes that was written for the slow cooker but as I’ve stated before those don’t fit into my life that well. So I transposed this, if you will, to be made in a fraction of the time on the stovetop!

Turned out great. And it’s really a fast thing to make, especially when you can buy those pre made tortellini’s  in the store. Life savers for a busy mom. I’m  not a mom but if I appreciated how fast this one was to make, I’m sure moms do to0 🙂 And the basil added at the end gives this a real boost of fresh flavor.

Ingredients: 

  • 3 cups chicken broth
  • 1 20 oz package of your favorite tortellini
  • 1 lb  Italian sausage
  • 2 Cans Diced Tomatoes (I used the ones seasoned with basil, garlic & oregano)
  • 4 oz. Neufchâtel Cheese (Or cream cheese)
  • Grated Parmesan Cheese
  • Fresh Basil

Instructions: 

1. Take your Neufchâtel out of the fridge, and let it sit and soften a bit while you brown your sausage in a large pot.

2. Drain your sausage once it’s cooked and add the tortellini to your pot. Pour the tomatoes with liquid and all, and broth over the top. Add your cream cheese to the pot in chunks.

3. Give it a good stir to get everything evenly distributed, making sure the liquids are adequately covering the tortellini.

4. Cook uncovered on med-high head for a total of about 30 minutes or so or until your tortellini is cooked and your sauce has thickened a bit.

5. Pour into individual bowls and top with basil and cheese if desired.

Sooooo simple and tasty! Hope you like it as much as we did.


xoxo

669058772380712020613


Fresh Veggie Greek Pasta

Fresh Veggie Greek Pasta

Ahhh, look how pretty this one is. Screams summer time BBQ to me.

20140323-125954.jpg

NEWS FLASH-I live in Wisconsin (ps. GO BUCKY!)

NEWS FLASH- it’s basically April and it snowed last week……

NEWS FLASH- I’m freaking sick of it!

I was desperate for something that tasted like summer and I came across this recipe.  It seemed so fresh tasting, and it was. 🙂

I made a dinner out of this and topped it with some chopped up chicken breast. We ate it warm. But I believe the recipe was originally intended to be a cold pasta salad. Like the ones you bring to SUMMER barbeques with friends when you wear shorts and tank tops and can sit outsiiiiiide and enjoy a cold beverage and possibly see some lightening bugs…ahhhhhh the good times. CAN. NOT.WAIT.

Anyway, we both really liked this dish. It was also a mini-milestone for me beeeecccaauuuse it contains kalmata olives and my Beau ate them! OK – he sort of picked around them while serving and it’s not like he said “these taste GREAT!” but after you hear this story you’ll realize why I’m so happy.

Jake and I have been together for about 6 and a half years. We met in college. Around our 1 year anniversary I decided to make him dinner. Back then it was a rare occurance as we lived in dorms or college housing and no access to a kitchen and we’re poor so there’s that. ANYWAY I choose to make a dish my mom always made called Medditeranean Chicken. Super simple and tasty. Basically 4 ingredients. Chicken breasts, cherry tomotoes, capers, kalmata olives- and then baked. Looking back, I have NO idea what I was thinking. Jake didn’t grow up eating as many diverse flavors as me and his palate was a little, limited shall we say. This was just too much.

Here’s the down and dirty version: I cook. I plate. We sit down. I take a bite=heaven. Jake takes a bite= run to bathroom, spit out food, brush teeth, gargle with Listerine immedietly.

How we are together to this day you ask? I don’t know. My feelings were so hurt but I tried to understand that it was “weird flavors!” for him. Anyway at the time, he pointed to the capers as being the death of him but after that it was both olives and capers that I had to hear about how he dispised them everytime they were in a 5 foot radius of him. I’m taking this dish a sign that almost 5 years later his palate has grown and adapted and they can slowly become part of our grocery repitiore.

But enough about me- Here is how you can make this deeeelicious recipe for you and your family!

Ingredients:
2-3 large tomatoes, seeded and chopped
½ cup Kalamata olives, pitted and chopped
½ cup feta cheese, crumbled
2 tablespoons chopped parsley(I prefer Flat Leaf Italian)
1 tablespoon chopped basil
¼ teaspoon salt
¼ teaspoon black pepper
1 pound penne pasta (or whatever pasta you want)
6 tablespoons olive oil
3 teaspoons garlic, minced

Instructions:
– In a large bowl, combine the chopped tomatoes, olives, feta, herbs and spices, salt and pepper. *If you want to serve this dish cold, you could add this mixture to the fridge at this point to chill
– Cook the pasta according to package directions. Drain in a collander.
– In the same pot, (with the pasta in the collander) heat the olive oil over medium-low heat. Add the garlic and cook, stirring, for 1-2 minutes without letting it turn brown and cripsy.
– Put the pasta back into to the pot and toss with olive oil mixture.
– Add the tomato-olive mixture and toss until the fresh vegetables are thoroughly mixed with the penne.
– Serve!

20140323-130018.jpg

Hope you enjoy! And I also hope the weather is warmer by you, but if it is please don’t tell me about it. I’m bitter, however I can’t complain tooooo much as it’s about 50 today. SPRING IS COMING!

Thanks for vewing !

xoxo

669058772380712020613

One Pot Pasta

One Pot Pasta

20140322-181341.jpg

Literally throw it all in a pot

Happy Sunday! Hope everyone had a great weekend. If you’re struggling for simple recipe ideas for the upcoming week, I’ve gotcha covered. This is seriously one of the simplest and tastiest week night meals ever! I first saw this and was like “ummmm what? there’s no way you can cook it all together and it doesn’t get gooey and mushy and naaaasty”  There were too many good reviews for me to not try it and also the hope that it really would be delicious was too much for me to take- I gave it a try.

I’ve made this multiple times since the first time and I’ve made a few adaptations. First of all, I really did find it a little “gummy” the first time- I’ve found that a good way to help reduce this is to not add all the water right at the beginning and then add more towards the end of the cooking if it needs it. Also one time I made this I had some extra spinach lying around which was close to being not so great anymore, I threw it in right at the end and let it wilt and it really look this to the next level. As you can see in the picture above, you seriously just throw it all together and let it cook. Magical! 🙂

Ingredients:

  • 12 ounces whole wheat linguine (or spaghetti, really just a long pasta)
  • 12 ounces cherry or grape tomatoes, halved or quartered if large
  • 1 onion, thinly sliced
  • 4 cloves garlic, sliced thinly or minced
  • 1/2 -1  teaspoon dried red-pepper flakes
  • 2 sprigs fresh basil, plus torn leaves for garnish
  • 2 tablespoons extra-virgin olive oil
  • Coarse salt and freshly ground pepper
  • 4 cups water (or chicken or veggie stock for added flavor)
  • 3 oz Fresh Spinach (about half a standard bag)
  • Freshly grated Parmesan cheese, for serving

Directions

  1. Combine pasta, tomatoes, onion, garlic, red-pepper flakes, basil, oil, 2 teaspoons salt, 1/4 teaspoon pepper, and about 3 and a half cups of water in a large pot. Bring to a boil over high heat. Boil mixture, stirring and turning pasta frequently with tongs, until pasta is al dente and water has nearly evaporated/soaked into pasta, which takes about about 10-12 minutes. This is where you can add more water if need be.
  2. Remove from heat. Stir in the spinach and let it wilt (like 2 minutes). Then season to taste with  extra salt and pepper, plate it up and garnish with basil and Parmesan cheese.
20140322-181305.jpg

ta da!

Sooo good. We love this and it’s packed with veggies and nutrients and yet soooo delicious you wouldn’t know it.

I have also made a Spicy Peanut Thai version of the one pot pasta- serisouly ALSO freaking delicious! Look for it in an upcoming post!

As always- thanks for reading, friends!

xoxo

669058772380712020613