
2016 CSA Series- Week 1
Can’t believe it’s almost time to pick up our next CSA box! If you missed our latest post about how we are participating in a Community Supported Agriculture (CSA) share this year, check it out here.
So since we are about to pick up our next box, it’s about time we share with you what got in our first box and what recipes and fun things we did with each of the items!
So here is the haul we received in week 1: Think you know what each item is? Let’s take a look:
- Asparagus
- Fresh breakfast radishes
- Buttercup Lettuce
- Bok Choy or Pac Choi
- Green Garlic
- Shallots
- Rhubarb
- Herb Pack (Thyme, Basil, Oregano, Sage)
- Pea Shoots
- Large bag of Spinach in the middle!
I love that we get such a wide variety of stuff in our boxes! It’s fun to experiment with different ingredients and never feel like you’re “drowning” in something and not sure what to do with it all.
Ok so lets get started! I’ll just list out each ingredient and post what we did
Asparagus I honestly love raw asparagus as a snack and the stuff I got was so skinny and beautiful and tender that I was half tempted just to snack on it. But that’s not very fun to share with all of you so I decided to try fermented “pickled” asparagus spears. If you want to learn more about the benefits of fermented foods and the amazing impact they can have on your health, check out our past post, here.
These asparagus spears are fermented and not pickled. What’s the difference? Pickled foods are preserved in an acidic medium, where fermented foods are preserved in salt water with a starter culture. These are sort of quasi pickled because as you’ll see below I used about a tablespoon of apple cider vinegar (make sure it says “with the mother” & here’s my favorite brand) to act as my starter.
If you’ve been wanting to dip your toes into fermenting your own foods but are a little hesitant, this the perfect recipe because it’s so simple, you don’t need any special equipment (just make sure to burp your jar occasionally). These bad boys are good on their own but probably even better as a garnish in a bloody mary! 🙂

 Radishes & Spinach Confession- I’ve never had cooked radishes before. I have always eaten them cold, preferably with a hefty sprinkle of sea salt too. But when I was researching something out of the norm to do with radishes, I came across this Radish & Spinach Pasta dish that looked too good not to give it a try.
If you think cooking radishes is weird, STOP IT! It’s delicious and you won’t be sorry. They turn a soft pink color and it sort of enhances their peppery flavor. Plus I mean the recipe also has bacon in it sooooo how can it be bad? We used the breakfast radishes (ok we ate a few cold too) and the beautiful spinach as well as a few of the shallots from our box. It turned out delicious. Not heavy at all and surprisingly light for it being pasta and all oh, and containing bacon but it really made for a delicious light summer dinner!

 **Don’t get rid of your radish greens! They are very nutritious and can be used for any number of things. In salads, in smoothies, in stir frys…I happened to be making some homemade chicken bone broth and threw them in there with it. I’m all for being resourceful and reducing waste!
Butter Lettuce Recently I posted about how much I love salads and how they’re the best super fast and healthy dinner for busy weeknights…aaaaand I still think that 🙂 Butter lettuce is so soft and yet crisp and delicious. I think that these would also be PERFECT for a lettuce cup but this time we opted for the traditional salad route. However the salad we made was anything but traditional. Topped with quinoa, loaded with veggies and dressed in THE most delicious “creamy” avocado dressing ….. you’ll find it hard to believe it’s “just” a salad!
 The dressing isn’t pictured above but it truly is amazing.
Bok Choy/Pac Choi & Green Garlic So another confession (you guys are really making me wear my heart on my sleeve today!) when I saw my farm list Pac Choi on the list for the box, I had no idea what it was. And then when I saw the picture I said to myself, wait…that’s BOK CHOY! Well it turns out, from what I was able to conclude, that Bok Choy and Pac Choi are one in the same. Now you know 🙂
I was very tempted to try to grill the pac choi but it was pretty large and I think that might work better with smaller more compact heads. So I settled on a Ginger Stir Fried Bok Choy & Green Garlic over Turmeric Rice. I had been wanting to try a rendition of some turmeric rice I had come across lately but didn’t know what to pair it with. These stir fried greens were perfect with it. My husband doesn’t really do well with meals that don’t have a lot of protein so I threw some nuts, and seeds on top and we were both happy! I used sliced almonds, pistachios, and some hemp seeds.
 and of course if you’re like me you are addicted to spicy and you top it with chili sauce (& some nutritional yeast 🙂 )
 Rhubarb I am obsessed with rhubarb. My mom and I have a matching cookbook that is dedicated solely to rhubarb. There’s so much you can do with it! I actually already had some more rhubarb just chilling in my fridge waiting to get used up so when I got some more in by box, it was the motivation to finally make something with it.
A coworker of mine had recently gifted me a hunk of her mint plant and seriously it’s growing like crazy in my pot. So I needed to use some of that bad boy and what better way to do that than with mojitos! And what’s better that regular old mojitos? Rhubarb Mint Mojitos ❤ We made a rhubarb simple syrup and then put that in some mojitos. But good news is that if mojitos aren’t your thing or drinking alcohol isn’t your thing, the syrup makes a delicious spritzer with just sparkling water as well! These will have their own special post coming soon, but you get sneak peek 🙂


 Use the syrup as you would in a “normal” mojito. Make sure to check back for the recipe post coming soon!
Pea Shoots If you’ve never tried pea shoots, you need to. They are such a fun ingredient. They taste exactly like freshly shelled peas and yet are a leafy green! I love the way they taste so I didn’t really want to cook them or drown out their taste with other ingredients.
I tried to make cauliflower steaks (big fail people, big fail) and needed a simple salad to go with. I used these to make a Pea Shoot & Arugula salad with lemon vinaigrette and needless to say, it was the highlight of the dinner and we wished there was more of it to drown out our sorrows of the less than delicious cauliflower 😉

Shallots  These were so adorable, if you are one who agrees food can be adorable. I mean look at them, they’re so little and cute! We used some in our radish pasta listed above, some in our stir fried bok choy also listed above, and still have some saved to use in the future.
Herb Pack This might have been my favorite thing in the box! I was so excited to get these goodies. We planted them to let them grow and hopefully (I say hopefully because if you saw my thumbs, they’re black as night) we can use to make various things, maybe they’ll even grow big enough so we can make our favorite chumichurri sauce!
Whew! That’s it! That’s what a week (plus a few days) of food looks like in our house. What do you guys think? What are some of your favorite things to do with the ingredients we got?
Thanks for hanging in there and reading along. Tune in again in two weeks to catch what was in our 2nd box and what we did with it all!
xoxo

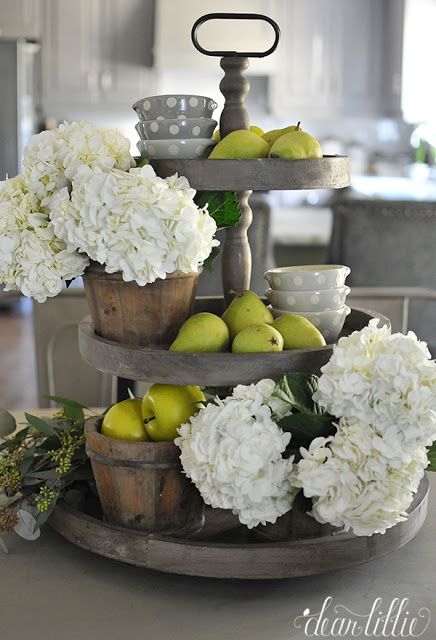
 This post is not food or crafts, it’s sort of a little out of left field for me. Hope that’s ok with everyone.:) It’s fun to spice things up a little sometimes, right? So how about a little home decor!! Or more so just a tribute to my love affair with these tiered stands and trays lately.


 You know those annoying “ads” on Facebook that are so misleading? Like the picture of a banana with the title “10 foods that are slowly killing you”. Yeah, you totally know the ones. They’re a buzzkill. Sometimes I’m deceived and click on them and read the craziest things and always wonder…what are these sites that only have that stuff? Who’s making money from this? How is this a real thing? Who writes that stuff? Do people believe this stuff? I probably spend too much time thinking about it to be honest.
 100% disclosure here…. I’m having a hard time not making these every day and eating them and rationalizing it as healthy for me. So far only the one batch of them, but I can feel another one coming on. I mean c’mon you guys….like, how could you not?


 You’re hungry for them now, right? Make them. You’ll love them. *pinkey swear promise*
 It’s been a while since I’ve shared a craft with you! Not that I haven’t been making any, but I forget to document them throughout the process. I made a bunch of stuff for the Holidays including all the crafts I did that were sponsored by


 *As you can see, I’m not tying anything off, just continuously wrapping the string around and back and forth between the nails. You want to keep the string tight so it doesn’t unravel or come off the nails but not soooo tight that it puts too much pressure on the nails that they pull out. This will make more sense once you’re doing it.
 Winter.is…..here. It’s snowy, it’s sleeting, it’s icy, it’s…..COLD.
 Now we were fortunate enough to have received a Vitamix as a wedding gift, but any high powered blender will work well (I’m told). I’m still learning the ways of the Vitamix and all the amazing things we can do with it. This was the first soup we made and I am SERIOUSLY impressed. I’ve obviously had a regular blender for most of my life and I’ve tried to make blended soups, both in the regular blender and also with an immersion blender. But seriously while those other two methods obviously work to a degree and definitely have their place in my kitchen for other tasks, I’ll never, EVER use either one again for the purpose of creating a smooth blend of ANYTHING(smoothies, soups, dips, hummus, etc…).
 Even though the soup does have beer and cheese in it, because, why not? Oh and Bacon….we got a hearty 6 servings out of this batch of soup so for each serving you aren’t really indulging toooo much. But it will taste like you are. While eating this soup, it was like an EXPLOSION of flavor. So many of them. We both said aloud, “Wow, this is great. It’s like you can taste all the individual ingredients but yet they combine to make a kick a** combo!” Paraphrasing of course 🙂 And no lie, the leftovers were even better.
 We used some pretty serious dark beer in ours, a dark ale from a local brewery, so our soup had some serious beer flavor, which we loved. But if you aren’t really into that, you could try a lighter brown ale (like Newcastle or something similar).

