Tiered Trays

Tiered Trays

Tiered Tray Blog HeaderThis post is not food or crafts, it’s sort of a little out of left field for me. Hope that’s ok with everyone.:) It’s fun to spice things up a little sometimes, right? So how about a little home decor!! Or more so just a tribute to my love affair with these tiered stands and trays lately.

I’ve been seeing this look all over Instagram and Pinterest but usually the items people post about are out of stock/no longer being made/or like $200 😦

My hubs and I bought our first house recently and are moving in soon (ahhhhh so excited!) so interior decorating and interior errrrrythang is on my mind lately. I just love the way these stands look, adding functionality as well as style. I don’t want to go overboard but I can see it in the kitchen, bathroom, living room, dining room….I mean no, I’m not going to put one in every room but I think the options are pretty versatile.

I was researching to find a reasonable priced stand that also had “the look”. I came across some really pretty good deals and thought I would share them with you. First a little inspiration (none of these are my photos)4bda948f4ab84257e2ca10e39ff0e85a4d619d01b8712db22bf97d2e6de357fd9520af66832ffd91274b617e12461539b1bf3790374515f13e6dc002a9b10f5dc36ecbea3c9cc12c6b2730a3a7ca4543633474f4d28c2328b0b4cb7021efdf5fd837a9d83e8e654295ef80e3e034f7d0

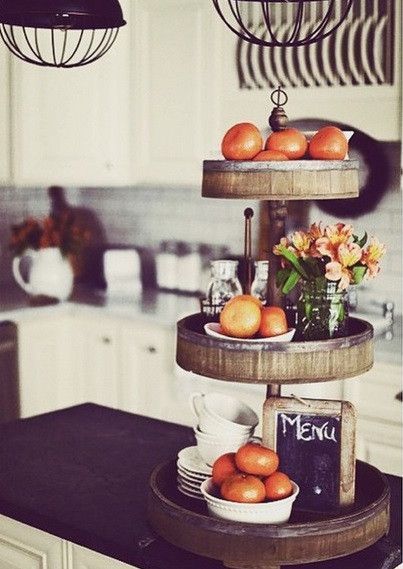
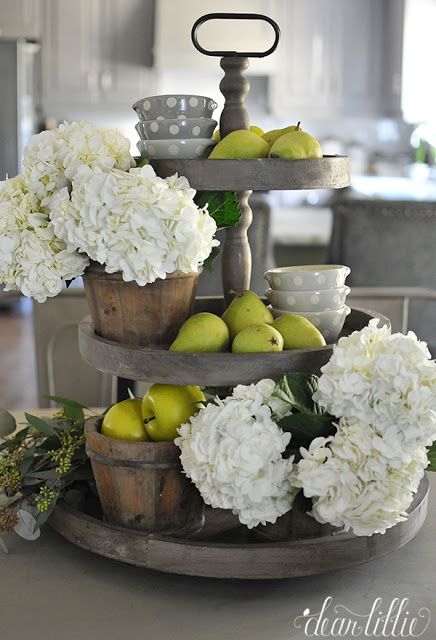
SO cute right?? Now onto where you can find one of these bad boys for yourself! Just click on the numbers below to link over to buy. Tiered Tray Shopping List1    2    3    4    5    (another option for #5)    6

I can’t even pick a favorite. Which one do you love most? And sorry not sorry in advance for the possibility of more home projects in the near future. These creative juices are flowing with a whole new house to redo, put my own touch on, and decorate like a page out of Restoration Hardware 🙂

How do you guys feel about this trend? Take it or leave it? Let me know if the comments below!!

xoxo

669058772380712020613


*None of the links in this post are affiliate or sponsored links. I’m just sharing products I liked and where to find them. 🙂 

String Art

String Art Tutorial

ANNOUNCEMENTIt’s been a while since I’ve shared a craft with you! Not that I haven’t been making any, but I forget to document them throughout the process. I made a bunch of stuff for the Holidays including all the crafts I did that were sponsored by JoAnn Fabric and Craft Store for the TV Segment back in December, but never really got around t0 posting them.

One of the things I did make for a Christmas gift for a friend of mine was a little cute string art heart. It was small (like 6 inches by 6 inches) but it turned out really good! When I gave it to her she decided we should have a crafting weekend (that is our “thing” we do together) so she could make something else for herself too! And of course I was up for it to actually make myself something too!

I brought the supplies and told her all she needed to do was print off the image or pattern she wanted to do. I show up at her house and with no discussion about it, we both printed the exact same thing to do our string art with. The great state of Wisconsin! 🙂 At first I had plans to do a heart around the Madison area but then I decided I just wanted a plain jane one, which is more my style.

It’s really not hard to do it takes a little time and you need to do the whole “stringing” part in one sitting, but it doesn’t take a whole lot of “skill”.
STRINGARTTUTORIALString Art Tutorial
Materials:

  • Soft (non hardwood) wood
  • Shape print out
  • Hammer
  • Short Nails ( I used ones similar to these)
  • String/thread (I used something similar to this)
  • *Optional small needle nose pliers

Instructions/Steps:

  • First things first, you need to find a piece of wood. Obviously whatever size you want but it’s also important to find a piece that’s not too hard as you’re nailing in a million little nails, you want to make it easy on yourself. Lots of craft stores actually sell cheap low quality (which is ok in this case) wood that is soft and perfect for these types of projects.
  • Next you need to find whatever shape you want to do. The first time I did a simple heart shape. For this one, I did the outline of Wisconsin. It’s really up to you. Pinterest is filled with ideas for this. Some of my faves right now are this, this, and this. Print out whatever shape or words you choose and then cut your image out.
  • Using one small piece of tape, place your paper shape cut outs on your wood. Begin pounding in nails just along the outer edge of your chosen shape. You want to try to space them as evenly as you can, but no need to drive yourself crazy.

20160109_180315

  • Sometimes it does get hard to pound in all the nails without pounding your fingers, especially when you get into tight areas (like the Door County of Wisconsin). If that is the case, you can use a needle nose pliers to hold the nail steady and in place while you hammer it in.
    af424277bb0800b59c4d16d7004ba69f
  • You want to pound the nails in far enough that they’re really “in there” but leave enough of the nail exposed so you a) don’t poke through the back of your wood, depending how thick your piece is and b) have enough nail to wrap your string around it several times.
    20160109_180321
  • Once you have surrounded your entire shape with nails, carefully remove the paper shape and tape. You’ll be left with just the nail outline of your shape(s).
    20160109_184127
  • Now comes the part that once you start, you can’t stop until you’re done. So take a bathroom break and get a snack 🙂 But for real, because you’re really just wrapping the string around the nails over and over and over again, pulling it tight(not tooooo tight) throughout the whole time, you can’t stop or it will all unravel.
  • Start by just tying a double knot with the string around one of the nails. Any nail, doesn’t matter, and you just cut the “tail” of the string off close to the nail rather than trying to get the end knotted perfectly around the nail. Now just start wrapping the string up, down, across, sideways, backwards, upside-down (kidding just running out of directions here) around the nails. Basically just weaving it all around the nails. Here’s a close up:
    20160109_19111120160109_191106*As you can see, I’m not tying anything off, just continuously wrapping the string around and back and forth between the nails. You want to keep the string tight so it doesn’t unravel or come off the nails but not soooo tight that it puts too much pressure on the nails that they pull out. This will make more sense once you’re doing it.
  • Just keep going until it looks “full” enough and even to your liking. Once you are done just tie off the string on one of the nail and again, don’t worry about the “tail” just double knot and then cut off very close to the nail.
  • Then you’re done!! Hang on your wall and admire your handy work 🙂
    20160226_182730

This is a really fun and pretty simple craft that can be done in an afternoon and produces such a cute and customized finished product. If you have kids who you are worried about them with nails and a hammer, you could even do the outline of a shape in nails and then let them do the “stringing”.

I hope this tutorial was easy to follow but if you have any questions, feel free to ask away and I’ll do my best to help!

We will have a few other crafts to share soon as we were asked again by JoAnn Fabric and Craft Stores and Madison ABC affiliate WKOW 27  to come back and do another on air spring crafting special! Could not be happier to be asked again and have the great opportunity to make some really adorable stuff again!!! If you’re in the area tune in on the morning of Sunday, March 6th to WKOW 27 Madison. I mean if you don’t want to wake up early for that, or if you’re not in the area, I’ll make sure to post a link to the video!

Thanks for checking out our string art tutorial!

xoxo

669058772380712020613

Organize your 2016

{Organize your 2016}

Brownies

HAPPY 2016! Ok so I’m not really one for New Years resolutions. Maybe it’s because my mind is constantly going 20,349,823,094,832 miles an hour and I think of things all the time I want to do to try to improve my life, my fulfillment, and my happiness and I’ll make the change when I think of it, not wait until January…..orrrr maybe it’s because each time I make one, they never stick.

What? Don’t look at me like that! They’re both sort of true.

Anyway, usually when the year comes to a close and the new one is right around the corner I think of organizing and getting ready for the turn of the calendar. *Oh and trying to mentally prepare for how many dates I’m going to have to erase when I accidentally write 2015 still* Seriously I swear it takes me until May to get the hang of it.

Calendars. Speaking of Calendars…(I bet you didn’t think this post was going in this direction) I wanted to share with you today some of the best free calendars and life organization tools that I’ve come across recently.

Did I mention free? 🙂 Bless these individuals for having the patience, creativity, and time to make these awesome resources and then HAND THEM OUT FOR FREE!

Here are some of my favorites!

  1. Kate at Small Paper Things has my favorite calendar templates. Simple, understated and beautiful. Not to mention her weekly planner, saves.my.life. Check out her post HERE. And honestly I love her entire site. It’s gorgeous and pretty much everything I want in life. Check her out and subscribe!
    • My Faves:
      • Calendar is so damn cute because it’s so simple.
      • Weekly Planner is like my favorite thing right now. I have it on my desk and it help my keep my head on. *I’m serious*

CaptureCapture

  1. Marie at Blooming Homestead has so many cute printables on her site. Her menu planner is ADORABLE and I plan to print it, laminate it, and put it on the fridge! She has birthday and anniversary lists by month, school work trackers, and a billion other adorable things in her Family Planner sets. She even has them available in 3 different prints/patterns. The floral stripe is my favorite but they’re all SO CUTE.  In addition she also has cute 2016 calendars available too!
    • My Faves:
      • The menu planner. Cmonnnn it’s like I want to menu plan now 🙂
      • The calendars are gorgeous too.
        • Note that you’ll be directed to Dropbox to download the files. 

Capture

Capture

  1. Jamin & Ashley at The Handmade Home have another great assortment of printables that make me feel I need to get my life together 🙂 Kidding; that are awesome for helping streamline your life! Also after reading this post I felt like I needed to run out a buy a reusable bound leather planner so I could print these pages and file them. I resisted the urge but I’m sure it will come back. They make it look so glamorous to be organized!
    • My Faves:

Capture

Capture

I know there are TONS of other great resources out there for this stuff and totally possible to create your own! I was drawn to these few examples in my recent searches and wanted to share with all of you.

Cheers to you and a happy, healthy, fulfilling, and organized(if you want to be 🙂 ) 2016!

xoxo

669058772380712020613

Roasted Brussels Sprouts & Butternut Squash

All Whisked Up! {Choripán Recipe}

 {Choripán}

Our fave (1)This week’s post is extra special!

Also a little longer than normal (bear with me)….let me explain!

Recently I became a member of a blogging group called Wisconsin Whisk. It’s a group of food bloggers in the great state of Wisconsin. The main goal is to connect bloggers in Wisconsin together with each other as well as with local producers, sponsors, advertisers to really nuture a community of support. As of right now, there are close to 40 blogs that are members! The majority are located around the Madison, Wisconsin area but there is certainly an impressive footprint of Wisconsin covered, from Eau Claire all the way down to Milwaukee and everywhere in between. Here is a list of members. Check them out! And if YOU are a food blog located in Wisconsin, consider joining!cropped-banny3_1A month or so ago, we had a first sort of ‘meet and greet’ event where some of us close to Madison got together to meet each other face to face and briefly cover what the goals of Whisk are and brainstorm ideas and discuss what members wanted to see Whisk help them accomplish.

One of the things we discussed was a sort of secret santa recipe swap if you will. The idea would be that if you wanted to participate you could put your name in a virtual bucket and you would be then be assigned another blog to go and research and find a recipe of theirs you wanted to try. You would make the recipe and document and photograph in your own style. Then those participating would unveil their “secret” recipes at the same date and time! We decided to call the event, All Whisked Up!

None of us know who is assigned our blog until posts are published (that’s today!).

My ‘assignment’ was to check out Kristin over at Everyday Celebrations.

Kristin describes herself as : “A former teacher turned wife, mom of 5, and author of Everyday Celebrations. She shares recipes and tips for celebrating life’s memorable moments and everyday celebrations. Some days celebrate a certain food, idea, or activity. Sometimes a day is set aside to remember or to increase awareness of a need. Each and every day should be celebrated by spending time with family and friends enjoying whatever time we are given”

Personally I absolutely love the positivity and gratitude that is practiced through finding the good in every day and having little celebrations all the time! Not to mention my admiration for a mom of 5 finding time to blog!

While looking through Kristin’s blog one of her posts and recipes really stood out to me. Kristin had a post highlighting when she made Choripan and I couldn’t help but try to make it myself.

What the hellllllz is choripan you ask? Ohhhh, sit tight, you’re gonna want to pay attention.

Super high level: Choripan is a type of sandwich that is incredibly popular in South America, most notably Argentina, Chile, Brazil, Guatemala, and a ton of others!

It’s name comes from a combination of it’s ingredients chorizo (chori) and bread (pan). It’s basically an fancy adult version of the american hot dog. Chorizo sausage grilled to perfection, split down the middle and served on crusty bread with chimichurri and pickled onions (that’s the most popular method).

Through my research I found that while most recipes you will see call for Chorizo, not all chorizo is the same. Normally when someone says Chorizo you think of mexican chorizo which has that classic red color needs to be removed from it’s casing and ends up as ground meat. But there are many different kinds of chorizo. Spanish chorizo even has many version all depending on the locale. But most notably, Brazilian and Argentinian Chorizo is made with pork sausage which is very closely related to italian sausage and has similar flavors with more heat and less fennel flavors.

I looked at every.single.type. of chorizo that was available at my grocery store and tried to pick the one that was like what’s described above. I decided to give two of them try for comparison. Both were actually very good but I would pick the Usingers brand over Klements. Probably just personal preference but I like the consistancy (less crumbly, more sturdy) and the taste (more robust) better than the other. Both were great and totally tasty though!
Our fave

flag_of_brazil_heart_sticker-rd0816af7c62d425787003e4c3b1597b1_v9w0n_8byvr_1024I have a special place in my heart for Brazil (Brasíl  ❤ ) from my travels there when I was in high school. And actually had choripan while I was there! This brought back memories for me and the chimichurri was like a walk down memory lane for my taste buds. This post and recipe was fun to make and even more fun and delicious to eat.

Kristin is keeping her recipe for her chimichurri on lock down 🙂 so we made our own version but stayed true to her vision. So without further adieu, here is our take on choripán!
20151004_164217444444 ALWAYSSUMMER (1)I pan fried my sausages
20151004_162423and made the chimichurri
20151004_163058and the pickled onions & tomatoes
20151004_163226it was such a beautiful spread I couldn’t help but snap more photos!
20151004_163316
20151004_162912Then you put it all together!

I slathered both sides of the bread with chimichurri and then placed the sausage on top, garnished with pickled onions and tomatoes and squished together.
20151004_16393722222And take a big bite
20151004_16432533333My favorite part was definitely the chimichurri. I actually used the leftovers a few days later on a baked chicken. Just stuffed some under the skin of the chicken and rubbed it down all over. It seriously tasted so good. You might will have some left over of this so experiment, have fun, and find another use!20151004_162630Whew! Done with pictures 🙂 This was really super delicious and Jake loved it, I loved it, so unique and flavorful. You should definitely give this recipe a try.

Also make sure to check out all the other blogs and member of Wisconsin Whisk! You can click on the little blue frog link down at the bottom to see all the other members who are participating in the recipe swap!

Have a wonderful weekend!!

xoxo

669058772380712020613

To view all the other All Whisked Up recipes, click here:


*Here is the inspiration post from everydaycelebrations

Super Simple Refrigerator Pickles

Simple Refrigerator Pickles

3HEYOOOO. It’s the weekend! This week I am sharing with you one of my FAVORITE things in the entire world.

Refrigerator pickles.

These babies are so good and fresh and crisp and all around, better than your average pickle!

1I know it’s a little late and past prime cucumber season but if you have some stragglers laying around or even save this for next year, you have to try this recipe!!

It’s a great first timer canning recipe because it really eases you into the process (i.e. you aren’t 100% true canning as these need to be refrigerated buttttt it’s a good start for newbies).
7
See how easy it is?!?! And they’re so good.
I may orrrr may not have eaten an entire jar by myself over the course of a week. You’ll be hooked.
2You can cut the cucumber however you want. I’ve done all cut the long way, all cut into little rounds, and this year a mix of both!!!
4Thanks for stopping by! I hope you have a wonderful weekend! We are off to a wedding today. The weather is supposed to be gorgeous!! (78 and sunny!) and then tomorrow depending how much we indulge tonight ( 😉 ) we’ll hopefully get outside and enjoy the last of this beautiful late summer weather!!
xoxo
669058772380712020613