Lemon Thyme Baked Chicken

Lemon Thyme Baked Chicken

EDIT of DSC_8224I am a sucker for anything with lemon, or garlic and love chicken so naturally I want to put them all together! This is a reallllly simple and delicious meal. It’s easy and quick enough for a weeknight but also tasty and ‘fancy’ enough for a weekend or dinner party with friends.

You could use whatever pieces of chicken you wanted. For this recipe I had skinless chicken breast pieces on hand, so I used that.

*Warning if you use pyrex or glass, it takes a little scrubbing to get the baked bits off the side when you’re done, but you can either use foil or get a good arm workout in for the day. 🙂

Ingredients:

1-2 tbsp olive oil
5-6 cloves of garlic, minced
1/3 cup of chicken broth
Zest from 1 lemon
Juice from 1 lemon
1/2 tsp dried oregano
1 tsp fresh thyme leaves
2 lbs skinless chicken breasts or however much chicken you want to make
Sea salt and freshly cracked pepper, to taste
Two sprigs of fresh thyme
2 lemons cut into wedges

Instructions: 

Preheat the oven to 400 degrees. Coat a baking dish with cooking spray.

Heat the olive oil in a skillet over medium heat; add the minced garlic and cook, stirring constantly, for 1 minute, making sure not to burn the garlic. Add the chicken broth, lemon zest, lemon juice, oregano, and thyme leaves to the pan. Pour the mixture into the baking dish. Season both sides of the chicken breasts with sea salt and freshly cracked pepper, to taste. Place the chicken in the baking dish along with the lemon wedges and the two sprigs of thyme.

Place into the oven and bake, basting occasionally, for 30-40 minutes or until the chicken is cooked through. Remove from the oven and let the meat rest for 5 minutes before slicing. Drizzle the pan sauce on top of the slices of chicken and serve. Enjoy!
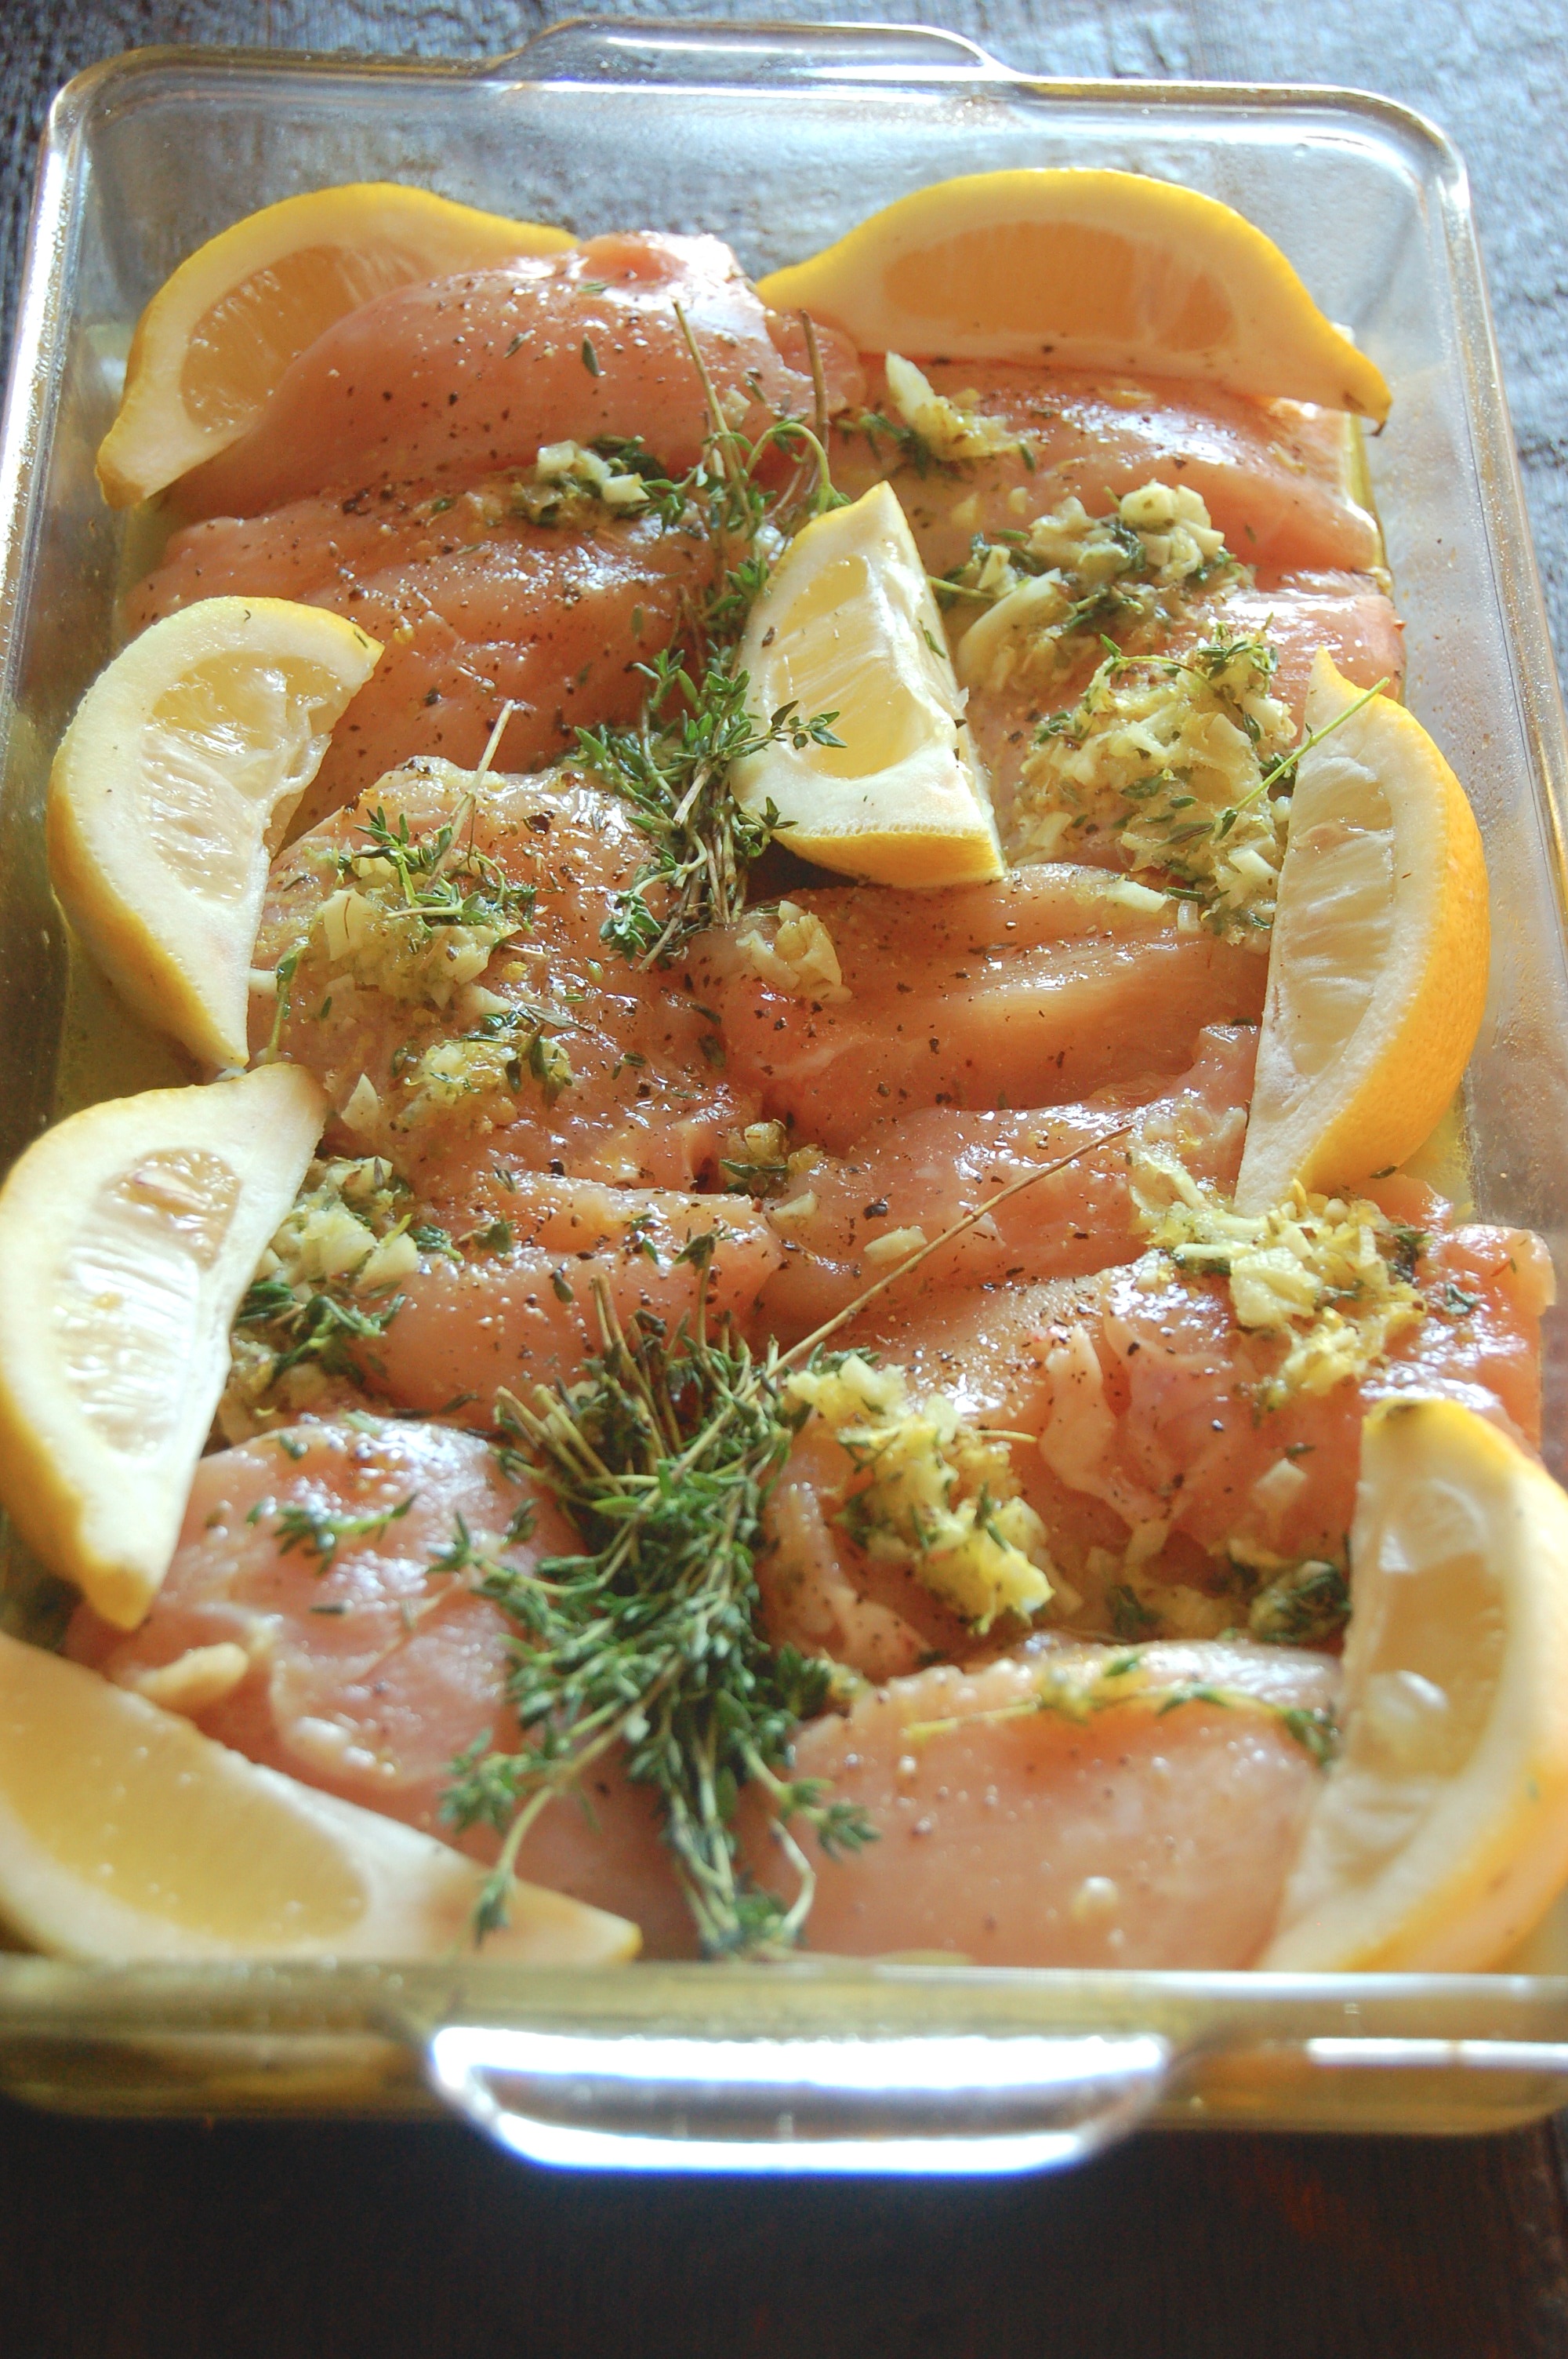
EDIT of DSC_8190

A before shot

EDIT of DSC_8218

After baking- and so pretty!


Such great fresh flavors with this. Fresh and tasty and easy. I can see myself sitting out on my non existent porch by our non existent fire circle eating this with a glass of cold Chardonnay. Ahhhhhh, see ya! I’m going to go day dream about that now.

Thanks for stopping by! Hope you enjoy!

xoxo

669058772380712020613

Goat Cheese, Sausage, and Arugula Stuffed Peppers

Goat Cheese, Sausage, and Arugula Stuffed Peppers

20140322-202648.jpg

Wowza you guys. This recipe is sooooo freaking good. simple. delicious. fresh. healthy. did I already say delicious? Because it is.

It probably doesn’t hurt that I am OBSESSED with Arugula. Something about that taste just gets my every time. Spicy. Nutty. A tiny bit bitter. Loveeee it.

This dish does a great job highlighting those flavors. And it has goat cheese. So, what’s not to like?

Ingredients:

3 medium bell peppers of any color, halved lengthwise, seeds and ribs removed
2 teaspoons olive oil
4 links sausage of your choice, casings removed (I used spicy italian)
1 onion, diced
4 ounces goat cheese, softened or just buy the pre-crumbled stuff
2 large handfuls of arugula (about 1½ ounces) *Rocket for all you non USA folks 🙂
Salt, pepper and/or red pepper flakes, to taste
1/4 cup  freshly grated Parmesan (or mozzarella)

Instructions:

Turn on oven to 400º. Place the prepped peppers in a baking dish and set aside.

Heat olive oil in a medium skillet set over medium-high heat. Add the sausage and cook until it browns, crumbling with a wooden spoon as it cooks. Drain the sausage and return to heat. Add the onion and cook until softened. Reduce heat to low and stir in the arugula and goat cheese until the cheese has melted and the arugula is wilted. Taste and add salt, pepper and red pepper flakes.

Spoon the filling into the peppers and sprinkle each half with Parmesan. Bake for 12-15 minutes, until the peppers have softened slightly. Hit with the broiler for about a minute to get the golden cheese on top and serve!

20140322-202603.jpg

I tried some with and without cheese on top

So I tried baking both with cheese on top and without. Honestly, the cheese sort of helped hold everything together but it’s one million percent possible to make this without the extra cheese on top. Just as delicious, just slightly messier.

20140322-202729.jpg

so pretty too!

Hmmmmmmm seriously sooo delicious. This meal was so quick to make and the flavors were aaaaaammmazing. I could have eaten the pepper “stuffing” by the spoonful out of the bowl.

Ok, I did that.

Don’t judge. It was soooooo good. You could serve this as a side or meal by itself! You need to make this pronto!

Also I just wanted to share that I’ve created some social media pages dedicated to the blog, check us out on Twitter and Facebook!

Thanks!

xoxo

669058772380712020613

Homemade German Potato Dumplings

German Potato Dumplings

20140322-205408.jpg

These are a family recipe passed down from my great grandma (my maternal grandpa’s mom) I never had the chance to meet her but she was one heck of a lady. She managed to provide for her very large family on a teeny tiny budget.

These were one of the tricks up her sleeve. These little dumplings are pretty cheap and easy to make but they’ll “stick to your ribs” as my family says and fill you up nicely!

This is kind of a shoot from the hip recipe, as I’ve only ever been told the ingredients but no the ratios. It’s really easy and you’ll figure it out quickly. They’re pretty much fool proof so don’t worry 🙂

Ingredients:

Mashed potatoes
Vegetable Oil
All Purpose Flour

This all depends how much you are making. I don’t even have a recipe for these bad boys but they are so simple, you don’t need one either. This is a great use for left over mashed potatoes but you could also make some for this purpose too. Homemade mashers obviously work well, but just know that boxed mashed potatoe flakes are also the bomb for this purpose too! (Boxed mashed potato flakes are like my guilty pleasure..shhhhh)

Anyway here is how you do it:

Instructions: 

1) Put your mashed potatoes in a large bowl (I’m not joking, like very large)

2) pour about 1 TBSP of oil in the potatoes (This is the “secret” to success)

3) add in a cup of flour at a time and mix in by hand until the dough is no longer tacky and you can roll into a ball without leaving half of it on your hands.
*I’m not going to sugar coat anything here. You will use a LOT of flour. Be prepared. And don’t skimp either!

4) once the dough is the right consistency, roll it into uniform dumpling sizes. You can make them whatever size you want, I’ve done small and large and everything in-between.

5) carefully drop them into a pot of boiling water and let them boil until they drift towards the surface. Then you’ll boil them for about 5-7 minutes. Again this depends on the size of your dumplings but thats a good rule of thumb.

You can take one out and test it too. Just cut it in half and see if it still looks doughy in the middle or cooked through.

6) Once they’re ready- serve them up! You serve with soup, a stroganoff, eat them by themselves..the possibilities are endless!

20140322-205451.jpg


These are the ultimate comfort food for me. They are so simple and it doesn’t hurt I grew up eating them so they remind me of so many great memories and special people throughout my life.

Has anyone else ever had these or grew up with them? Most of the people I’ve talked to have only had dumplings that were sort of like bisquick mix made. More light and airy. These are definitely dense and more delicious in my opinion 🙂

Thanks as always for checking out my blog. Hope spring is in full swing where ever you are reading from.

xoxo

669058772380712020613

Sausage & Cheese Tortellini

Sausage & Cheese Tortellini

20140323-130818.jpg

Hi friends! And a special shout out to all the moms on Mothers Day! ❤

This is one of those recipes that was written for the slow cooker but as I’ve stated before those don’t fit into my life that well. So I transposed this, if you will, to be made in a fraction of the time on the stovetop!

Turned out great. And it’s really a fast thing to make, especially when you can buy those pre made tortellini’s  in the store. Life savers for a busy mom. I’m  not a mom but if I appreciated how fast this one was to make, I’m sure moms do to0 🙂 And the basil added at the end gives this a real boost of fresh flavor.

Ingredients: 

  • 3 cups chicken broth
  • 1 20 oz package of your favorite tortellini
  • 1 lb  Italian sausage
  • 2 Cans Diced Tomatoes (I used the ones seasoned with basil, garlic & oregano)
  • 4 oz. Neufchâtel Cheese (Or cream cheese)
  • Grated Parmesan Cheese
  • Fresh Basil

Instructions: 

1. Take your Neufchâtel out of the fridge, and let it sit and soften a bit while you brown your sausage in a large pot.

2. Drain your sausage once it’s cooked and add the tortellini to your pot. Pour the tomatoes with liquid and all, and broth over the top. Add your cream cheese to the pot in chunks.

3. Give it a good stir to get everything evenly distributed, making sure the liquids are adequately covering the tortellini.

4. Cook uncovered on med-high head for a total of about 30 minutes or so or until your tortellini is cooked and your sauce has thickened a bit.

5. Pour into individual bowls and top with basil and cheese if desired.

Sooooo simple and tasty! Hope you like it as much as we did.


xoxo

669058772380712020613


Cheesy Bacon Oven Potatoes with Chipotle Ranch Sauce

Cheesy Bacon Oven Potatoes

with Chipotle Ranch Sauce

20140323-130454.jpg

Cheesy Bacon Oven Chips

Ingredients:
2-3 russet potatoes, scrubbed well and sliced uniformly into 1/8″ rounds (I left the skin on mine but you could peel)
cooking spray
3/4 C. shredded colby jack or cheddar cheese
salt & pepper
2 T. crumbled bacon (about 2 slices) – I used real bacon
Chopped green onions or chives, for garnish

Directions:
Turn oven on to 375 degrees. Bring sliced potatoes to a boil in cold, salted water and cover for 5 minutes. Drain, and carefully (they’re hot!) transfer slices to a countertop or cutting board and pat them dry.

Grease a baking sheet with cooking spray or olive oil, and lay out potato slices so they are slightly overlapping. Sprinkle with salt & pepper to taste. Sprinkle evenly with shredded cheese & bacon. Bake 12-14 minutes in preheated oven until cheese is melted & bubbly. Top with your garnish of choice.  Serve with chipotle ranch sauce (recipe below).

Chipotle Ranch Dipping Sauce

Ingredients:
1 T. ranch dressing
3 T. plain greek yogurt (or sour cream)
1/4 t. chipotle chili powder
1/8 t. cayenne ( more or less depending how spicy you want to make it)
1/8 t. salt
1/4 t. garlic powder

Directions:
Mix together all ingredients in a bowl.  Refrigerate any leftovers. This makes a really tasty dip for veggies and stuff too!

This was a very quick and easy recipe to make! I saw it on Pinterest (duh) and was just craving it for some reason. I had some extra potatoes laying around (I don’t typically have white potatoes stocked) so it was fate! Boiling the potatoes first really helped them be fully cooked without cooking for so long in the oven and burning all the ingredients on top. It was kind of unhealthier than the food I typically make, but you gots ta do that sometimes 🙂

Hope you enjoy! And thanks for stopping by!

xoxo

669058772380712020613