Homemade German Potato Dumplings

German Potato Dumplings

20140322-205408.jpg

These are a family recipe passed down from my great grandma (my maternal grandpa’s mom) I never had the chance to meet her but she was one heck of a lady. She managed to provide for her very large family on a teeny tiny budget.

These were one of the tricks up her sleeve. These little dumplings are pretty cheap and easy to make but they’ll “stick to your ribs” as my family says and fill you up nicely!

This is kind of a shoot from the hip recipe, as I’ve only ever been told the ingredients but no the ratios. It’s really easy and you’ll figure it out quickly. They’re pretty much fool proof so don’t worry 🙂

Ingredients:

Mashed potatoes
Vegetable Oil
All Purpose Flour

This all depends how much you are making. I don’t even have a recipe for these bad boys but they are so simple, you don’t need one either. This is a great use for left over mashed potatoes but you could also make some for this purpose too. Homemade mashers obviously work well, but just know that boxed mashed potatoe flakes are also the bomb for this purpose too! (Boxed mashed potato flakes are like my guilty pleasure..shhhhh)

Anyway here is how you do it:

Instructions: 

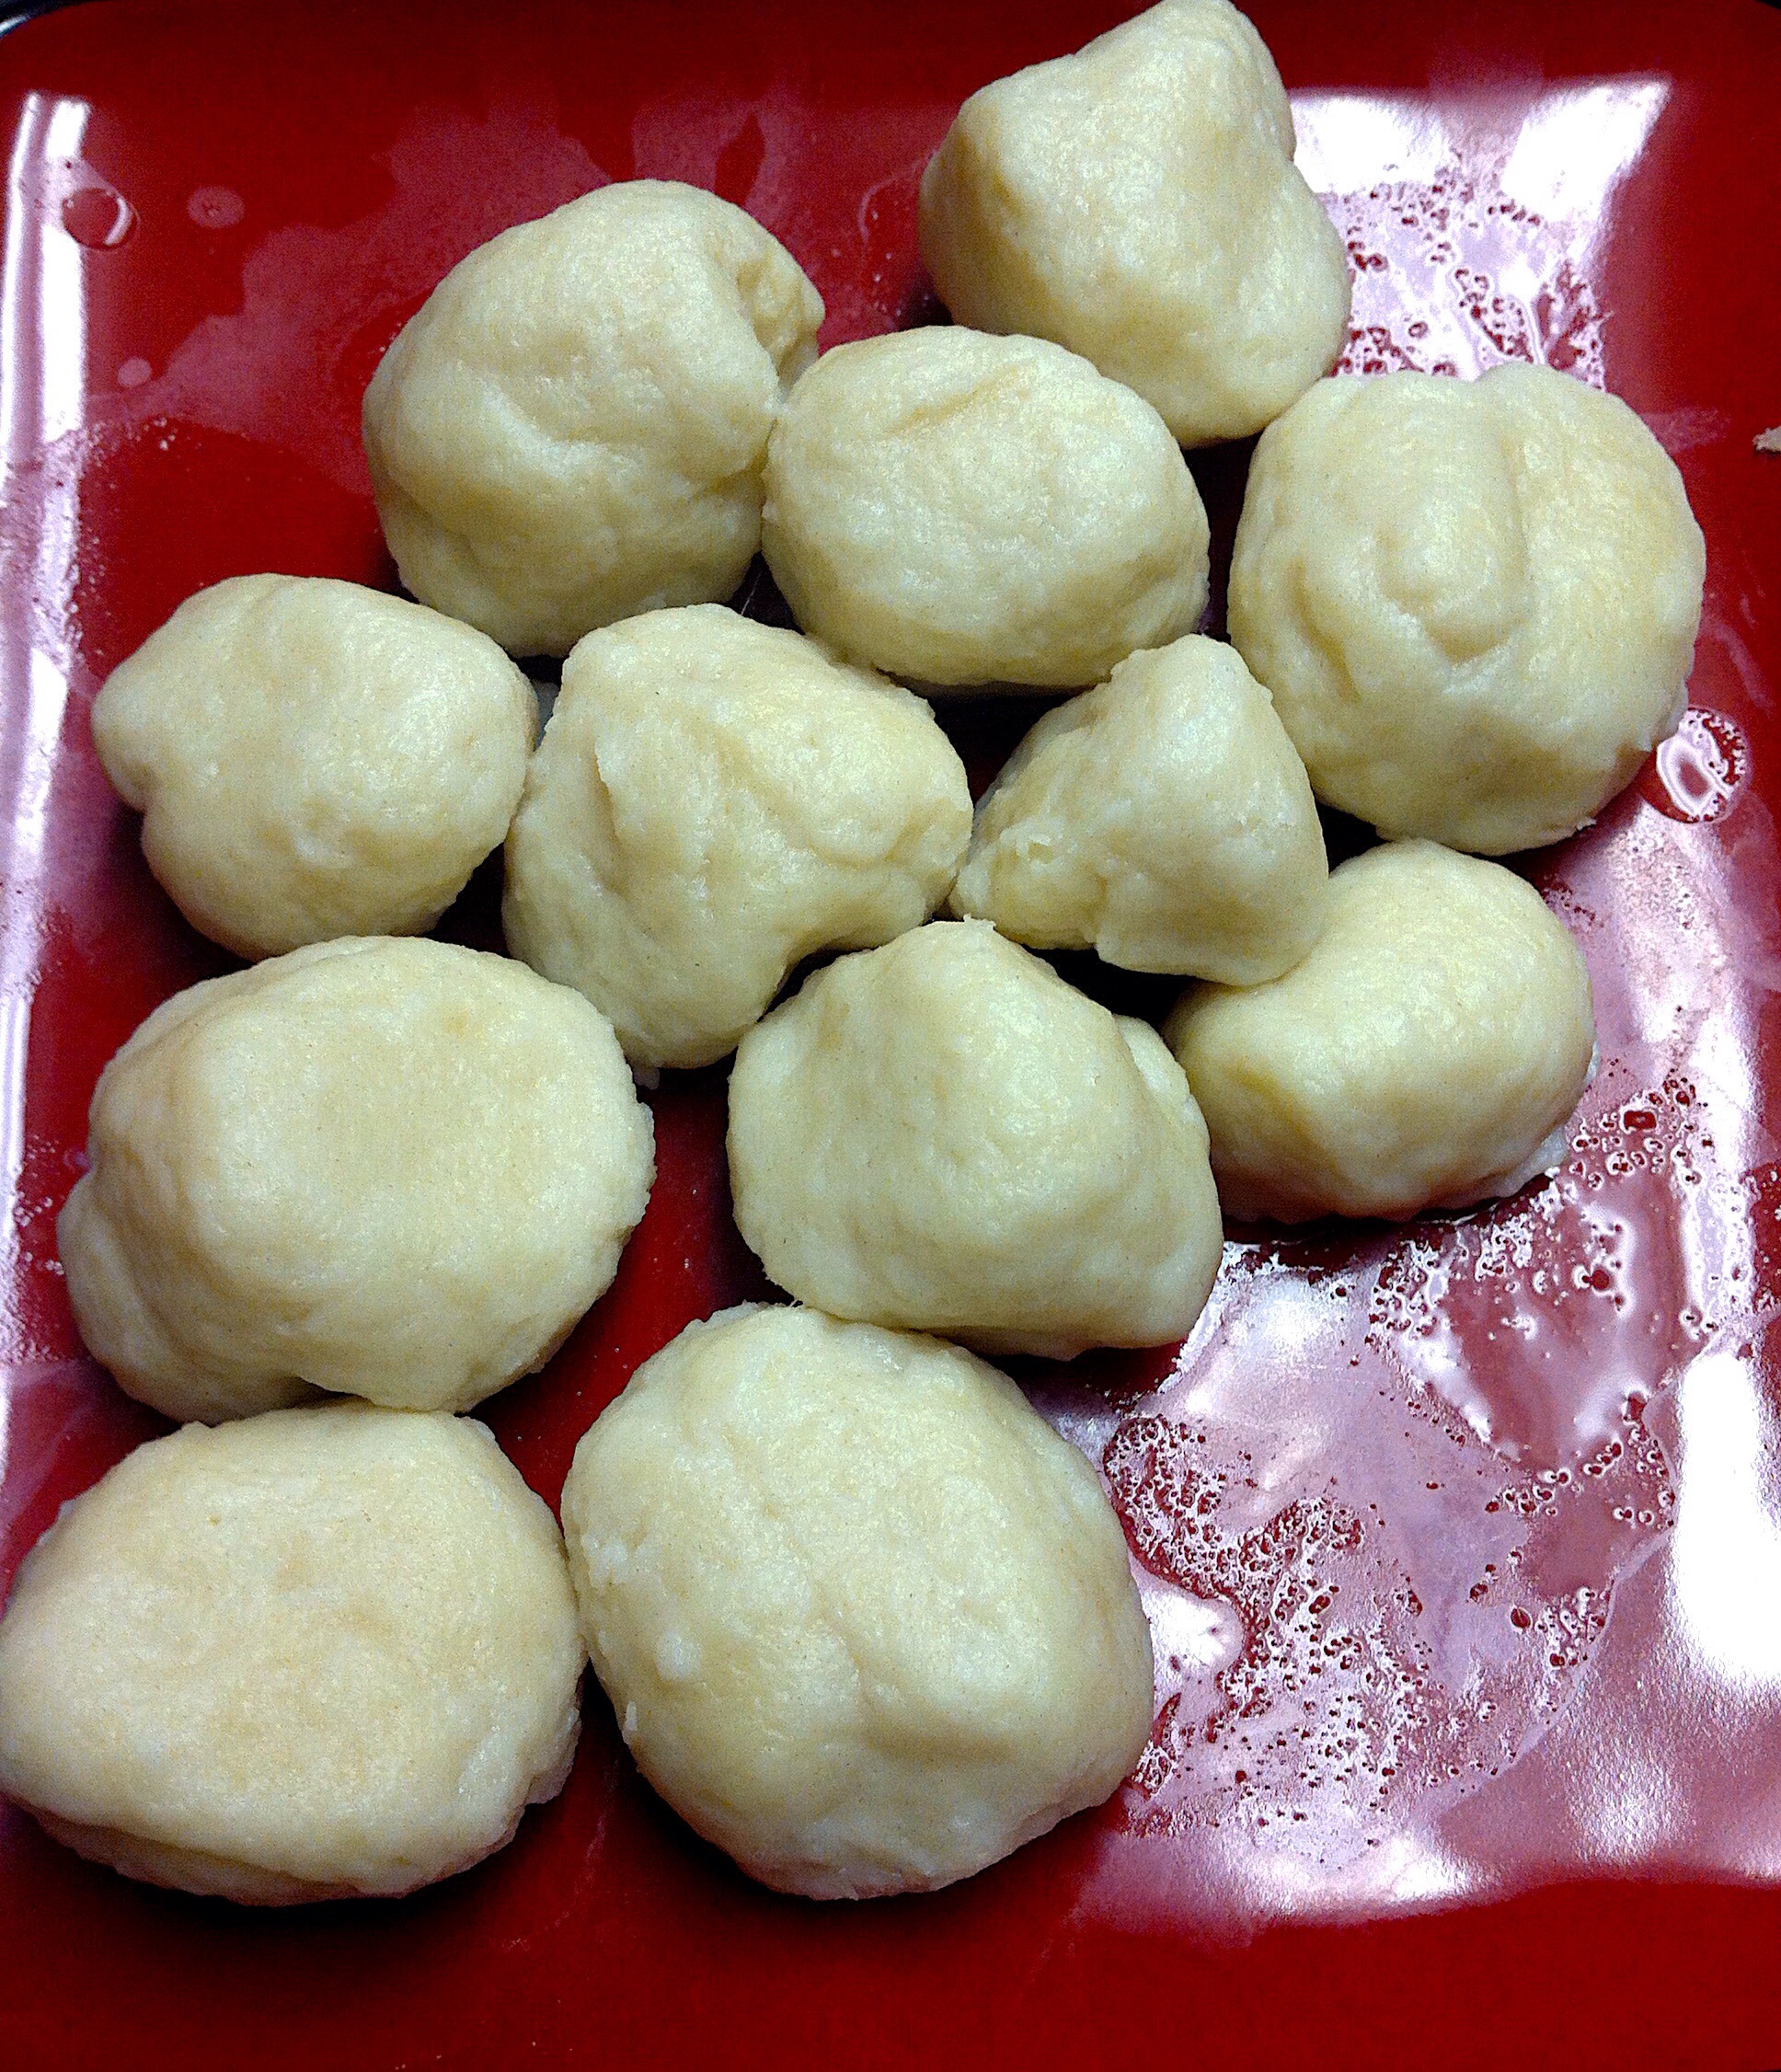
1) Put your mashed potatoes in a large bowl (I’m not joking, like very large)

2) pour about 1 TBSP of oil in the potatoes (This is the “secret” to success)

3) add in a cup of flour at a time and mix in by hand until the dough is no longer tacky and you can roll into a ball without leaving half of it on your hands.
*I’m not going to sugar coat anything here. You will use a LOT of flour. Be prepared. And don’t skimp either!

4) once the dough is the right consistency, roll it into uniform dumpling sizes. You can make them whatever size you want, I’ve done small and large and everything in-between.

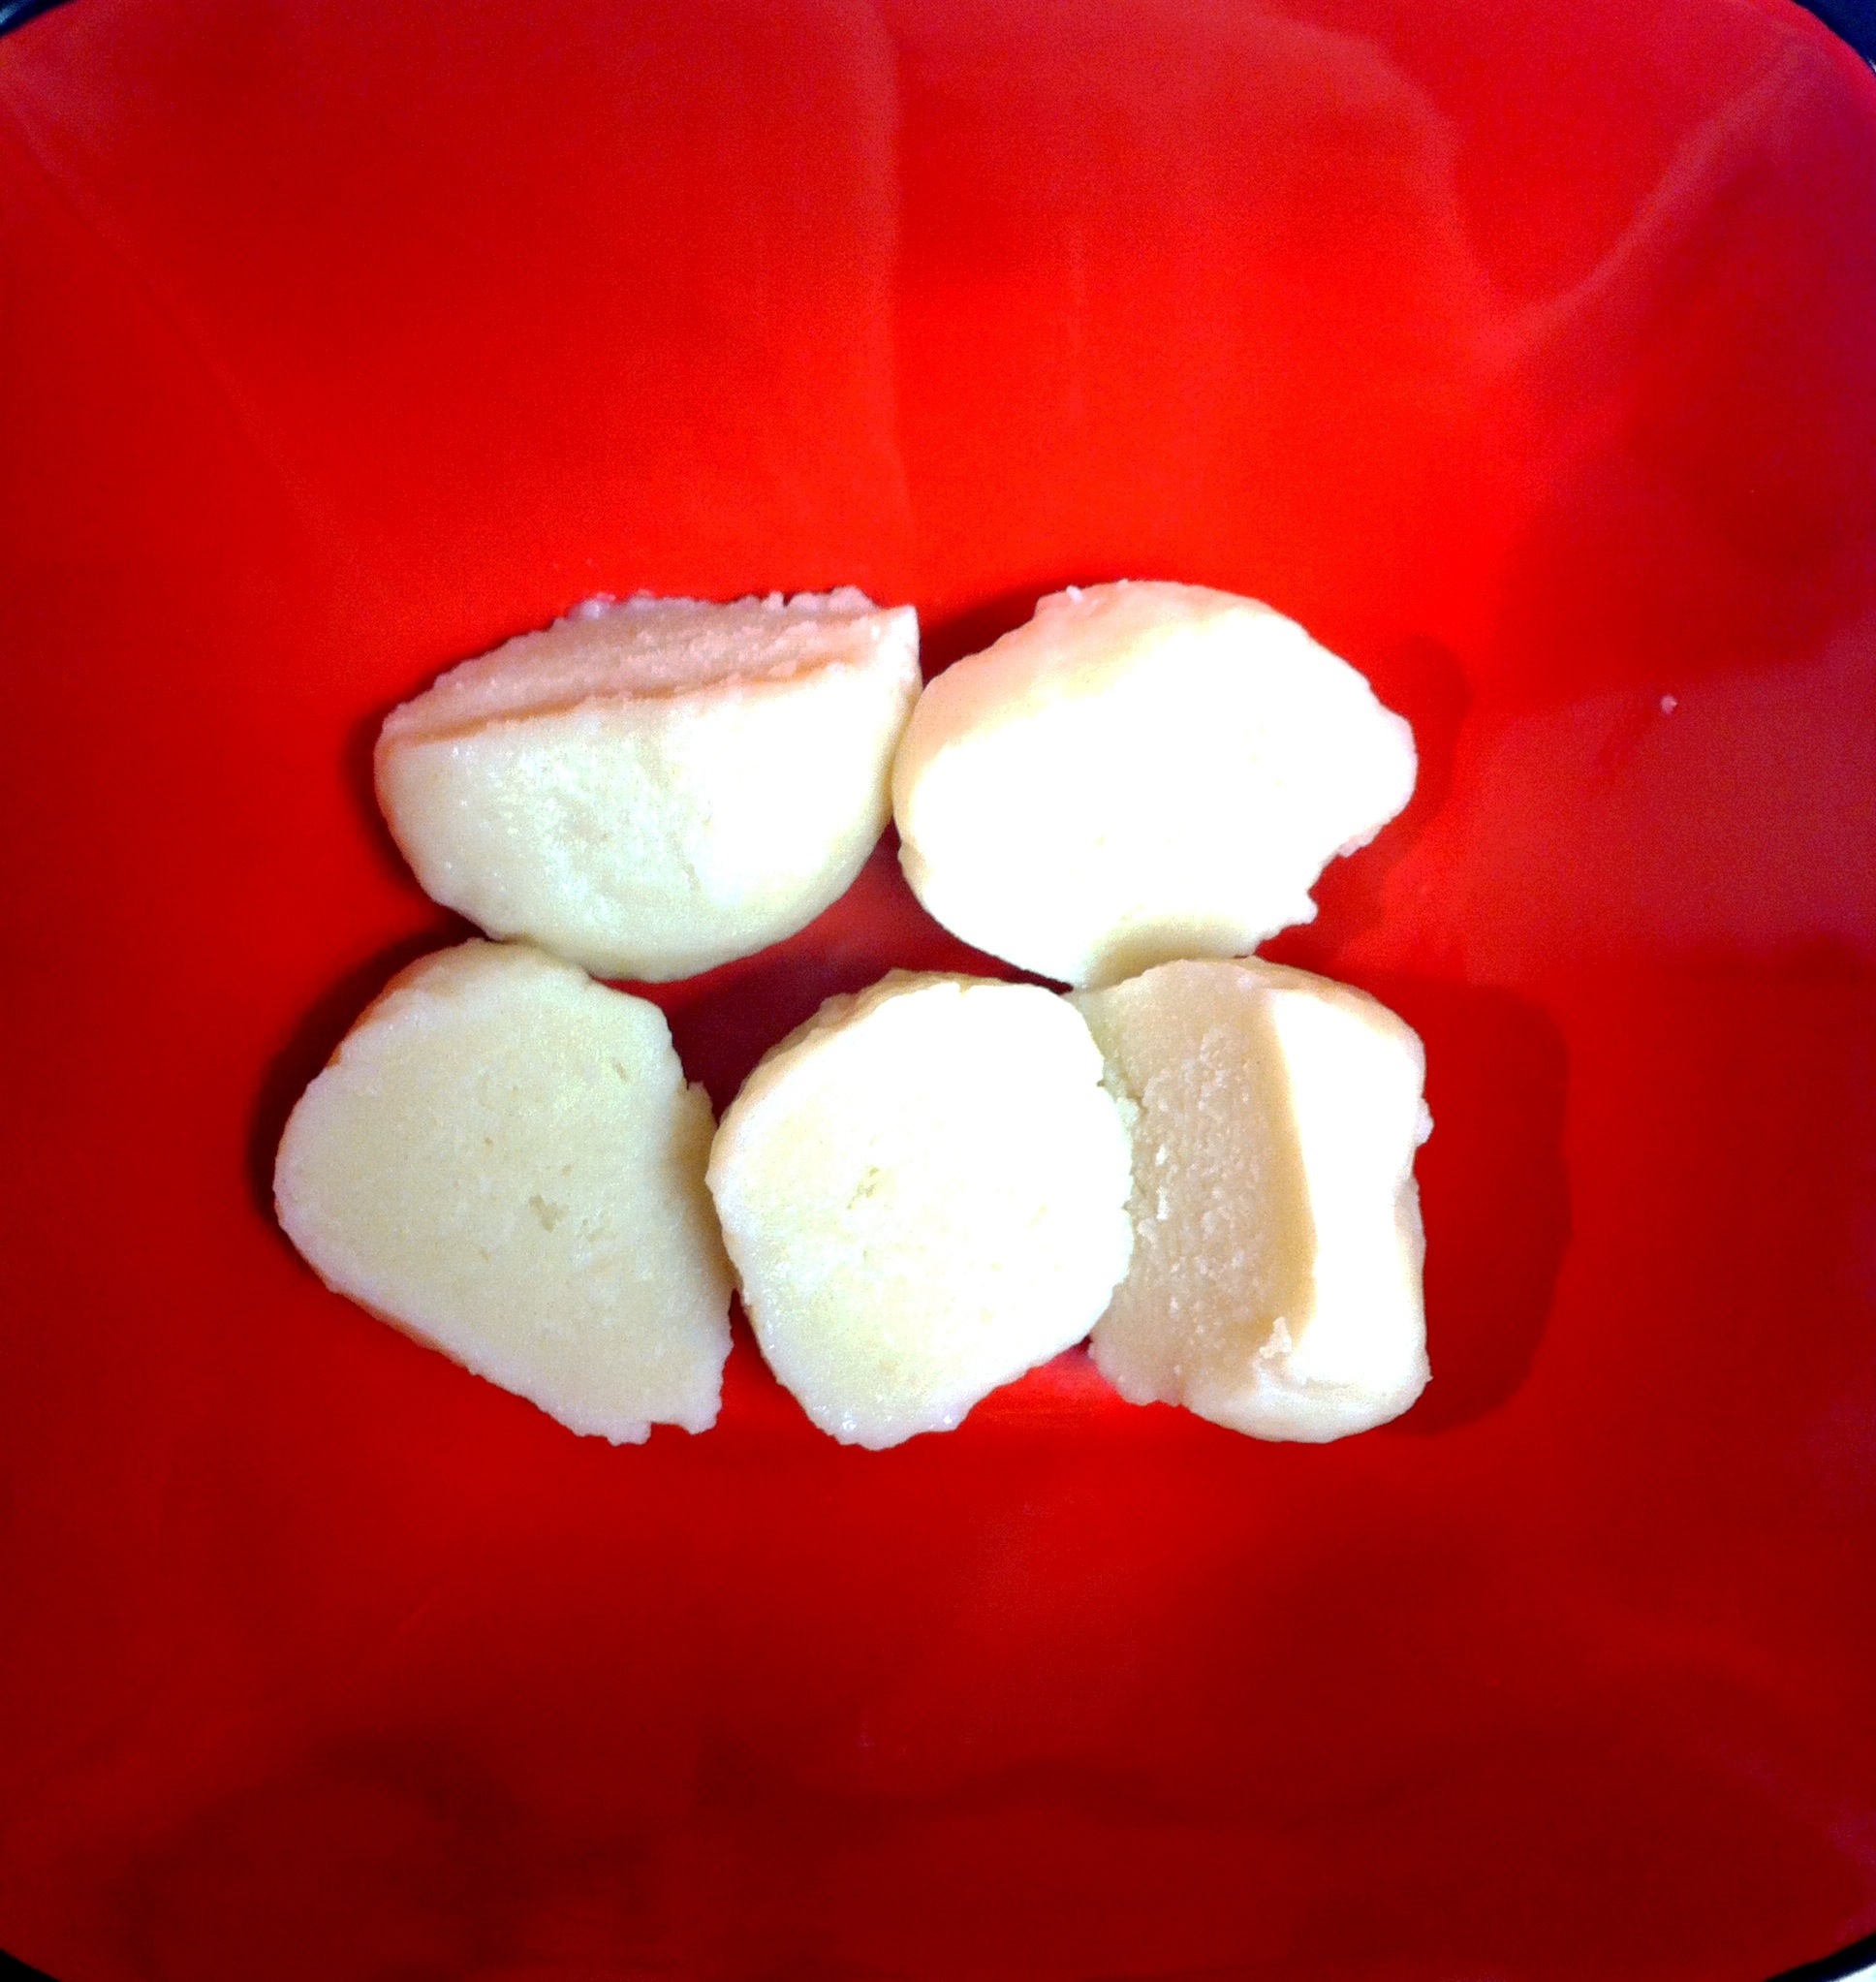
5) carefully drop them into a pot of boiling water and let them boil until they drift towards the surface. Then you’ll boil them for about 5-7 minutes. Again this depends on the size of your dumplings but thats a good rule of thumb.

You can take one out and test it too. Just cut it in half and see if it still looks doughy in the middle or cooked through.

6) Once they’re ready- serve them up! You serve with soup, a stroganoff, eat them by themselves..the possibilities are endless!

20140322-205451.jpg


These are the ultimate comfort food for me. They are so simple and it doesn’t hurt I grew up eating them so they remind me of so many great memories and special people throughout my life.

Has anyone else ever had these or grew up with them? Most of the people I’ve talked to have only had dumplings that were sort of like bisquick mix made. More light and airy. These are definitely dense and more delicious in my opinion 🙂

Thanks as always for checking out my blog. Hope spring is in full swing where ever you are reading from.

xoxo

669058772380712020613

Sausage & Cheese Tortellini

Sausage & Cheese Tortellini

20140323-130818.jpg

Hi friends! And a special shout out to all the moms on Mothers Day! ❤

This is one of those recipes that was written for the slow cooker but as I’ve stated before those don’t fit into my life that well. So I transposed this, if you will, to be made in a fraction of the time on the stovetop!

Turned out great. And it’s really a fast thing to make, especially when you can buy those pre made tortellini’s  in the store. Life savers for a busy mom. I’m  not a mom but if I appreciated how fast this one was to make, I’m sure moms do to0 🙂 And the basil added at the end gives this a real boost of fresh flavor.

Ingredients: 

  • 3 cups chicken broth
  • 1 20 oz package of your favorite tortellini
  • 1 lb  Italian sausage
  • 2 Cans Diced Tomatoes (I used the ones seasoned with basil, garlic & oregano)
  • 4 oz. Neufchâtel Cheese (Or cream cheese)
  • Grated Parmesan Cheese
  • Fresh Basil

Instructions: 

1. Take your Neufchâtel out of the fridge, and let it sit and soften a bit while you brown your sausage in a large pot.

2. Drain your sausage once it’s cooked and add the tortellini to your pot. Pour the tomatoes with liquid and all, and broth over the top. Add your cream cheese to the pot in chunks.

3. Give it a good stir to get everything evenly distributed, making sure the liquids are adequately covering the tortellini.

4. Cook uncovered on med-high head for a total of about 30 minutes or so or until your tortellini is cooked and your sauce has thickened a bit.

5. Pour into individual bowls and top with basil and cheese if desired.

Sooooo simple and tasty! Hope you like it as much as we did.


xoxo

669058772380712020613


Cheesy Bacon Oven Potatoes with Chipotle Ranch Sauce

Cheesy Bacon Oven Potatoes

with Chipotle Ranch Sauce

20140323-130454.jpg

Cheesy Bacon Oven Chips

Ingredients:
2-3 russet potatoes, scrubbed well and sliced uniformly into 1/8″ rounds (I left the skin on mine but you could peel)
cooking spray
3/4 C. shredded colby jack or cheddar cheese
salt & pepper
2 T. crumbled bacon (about 2 slices) – I used real bacon
Chopped green onions or chives, for garnish

Directions:
Turn oven on to 375 degrees. Bring sliced potatoes to a boil in cold, salted water and cover for 5 minutes. Drain, and carefully (they’re hot!) transfer slices to a countertop or cutting board and pat them dry.

Grease a baking sheet with cooking spray or olive oil, and lay out potato slices so they are slightly overlapping. Sprinkle with salt & pepper to taste. Sprinkle evenly with shredded cheese & bacon. Bake 12-14 minutes in preheated oven until cheese is melted & bubbly. Top with your garnish of choice.  Serve with chipotle ranch sauce (recipe below).

Chipotle Ranch Dipping Sauce

Ingredients:
1 T. ranch dressing
3 T. plain greek yogurt (or sour cream)
1/4 t. chipotle chili powder
1/8 t. cayenne ( more or less depending how spicy you want to make it)
1/8 t. salt
1/4 t. garlic powder

Directions:
Mix together all ingredients in a bowl.  Refrigerate any leftovers. This makes a really tasty dip for veggies and stuff too!

This was a very quick and easy recipe to make! I saw it on Pinterest (duh) and was just craving it for some reason. I had some extra potatoes laying around (I don’t typically have white potatoes stocked) so it was fate! Boiling the potatoes first really helped them be fully cooked without cooking for so long in the oven and burning all the ingredients on top. It was kind of unhealthier than the food I typically make, but you gots ta do that sometimes 🙂

Hope you enjoy! And thanks for stopping by!

xoxo

669058772380712020613

Carnitas

Easy Slow Cooker Carnitas

IMG_2521

Everyone always talks about how great slow cookers are. And don’t get me wrong, I 100000% see the appeal of them but I hardly ever use them. I am gone from my house wayyyy longer than these recipes say to cook them for. I usually leave the house around 6:40 everyday and get home around 5. That’s IF I go straight to and from work- no errands or anything. Then on top of that my fiance doesn’t get home for several hours after me and I’m a big believer in eating dinner as a family, even if that is just the two of us, so I always wait for him.
People have suggested outlet timers for recipes so I can set the crock pot to start cooking half way through the day- but sorry it grosses me out to have food sitting out at room temperature for hours, so no. And yeah I know there are crock pots with self  timers but I don’t have one- I’m more old school 🙂 and plus I can never shake the feeling that leaving that on all day while I’m not there, the house will burn down. Thanks a lot anxiety!
Anyway on this rare occasion I decided to whip out the ole crock pot and try this delicious recipe from Lindsay over at Pinch of Yum. I adapted a few things but but the result was still delicious!
Hope you enjoy!
INGREDIENTS
  • 4-5 lbs. pork shoulder
  • 2-3 fresh jalapenos
  • 5 cloves garlic
  • 1 tablespoon salt
  • 1 teaspoon cumin
  • 1 teaspoon chili powder
  • 1 teaspoon black pepper
  • 1 teaspoon oregano
  • ÂĽ teaspoon cinnamon
  • ½ teaspoon cayenne pepper
  • ½ teaspoon chipotle pepper
  • juice of 2 limes
  • ½ cup orange juice
  • 12 ounces beer
  • ½ cup salsa (I used a less chunky one)
INSTRUCTIONS
  1. Place the pork shoulder in the slow cooker. Slice up the jalapenos how ever you want and throw them in. Roughly chop the garlic and place in the slow cooker (I actually made a couple of slits in the meat with my knife and shoved some down into the meat to get as much garlic flavor as possible, but you could just toss it in, too).
  2. Sprinkle the meat with salt, cumin, chili powder, black pepper, oregano, cinnamon, and cayenne. Rub seasonings onto the pork.
  3. Add the liquids  and salsa. Cover and cook on low for 8 hours.
  4. Shred hunk -o- meat with two forks directly in the slow cooker (or take out & shred). It should fall apart pretty easily and be very tender.
  5. Preheat your oven broiler. Line a baking sheet with aluminum foil. Place the shredded meat on the cooking sheet and pour a few spoonfuls of sauce over the top. Broil for 8-10 minutes or until you get yummy brown edges on the pork.
  6. Eat by itself. Kidding (kind of ) Serve on tortillas with fresh cilantro, avocado, and lime juice and any other things you want!

This was a nice easy recipe. I mean when I actually can use the crock pot to make meals I love it! I could have eaten just the meat by itself. I took some of the leftovers for lunch over rice with some black beans….deeelicious!

Thanks for stopping by and checking out Eat Laugh Craft.

xoxo

669058772380712020613

Roasted Veggie & Black Bean Burritos

Roasted Veggie & Black Bean Burritos


Heyyy-o! It’s fridayyyy friiiidaaay (you’re welcome that song is now stuck in your head). But seriously I pretty pumped that it’s the weekend! The weather is starting to look up around here (high of 66 today!) and I am visiting a old roomie from my college days tonight. Life is good.

I was browsing through my dashboard (basically like the settings portal of my blog) here on WordPress and saw that I didn’t ever publish this recipe! I made a quite a while ago and it was deeelcious but must have spaced on the publishing part.

This would also work great as a gluten free option to just make the “stuffing” part of the burrito and put it over rice or or quinoa or any grain you want etc…

Hope you enjoy this tasty meal and also the helpful burrito rolling tip below 🙂

INGREDIENTS:
2 whole Sweet Potatoes, peeled And cubed small
2 whole Jalapenos diced
1 whole Red Pepper, diced
1 whole Red Onion, diced
2 teaspoons Olive Oil
1 teaspoon Cumin
1 teaspoon Chili Powder
1 pinch Salt And Pepper
2 cups cooked Black Beans (or 1 15 oz can rinsed and drained)
½ cups Fresh Cilantro, chopped
2 teaspoons Fresh Lime Juice
1 cup Shredded Cheddar
1 package Burrito-Sized Wheat Tortillas Or Wraps (6-10 Count) but really any tortilla will work.

INSTRUCTIONS:
In a bowl, toss your raw veggies in olive oil and season with spices. Place in a large baking dish and roast in 425 degree oven for 20 minutes, tossing around halfway through.
20131215-213855.jpg

Let cool. Add your roasted veggies to a cans worth of rinsed black beans. Add cilantro and squirt of fresh lime juice. Combine gently. At this point, mixture can be stored for later use if want to make this part ahead of time.

20131215-213906.jpg

Warm your tortillas of choice in microwave for about 30 seconds (so they are easier to handle and roll). Spray a casserole dish with nonstick spray or olive oil spray.
Add few heaping spoonfuls of vegetable and bean mixture to center of wrap. Top with shredded cheese. Fold in sides, and then roll up to complete(see pic below).Place in pan and continue to roll the others. Place into your baking dish, seam side down so that they stay together.
Bake in 375 degree oven for about 15 minutes or until golden brown. Baking this way will make the tortilla wrap crisp. It’s up to you if you want to sprinkle with cheese or not, I just thought it would look a little ‘prettier’.

** Tip: Premake your burritos and wrap them in aluminum foil. Keep in refrigerator for 3-4 days for a quick lunch or dinner!

Burrito Rolling 101:

20131215-213916.jpg

This is how my mom taught us to roll up our tortillas. I have been doing it this way since before I can remember. It blows my mind to see people do it any other way. I mean your “stuffing” is falling out all over the place and you, more likely than not, end up with food all over you! All I do is fold in the sides of the burrito like the the top left picture and then roll up(tucking in the ‘insides’ while you go) to complete it! Super simple and it all stays inside.

Hope you guys enjoy this one. It is a healthy, filling, tasty dinner!

xoxo

669058772380712020613