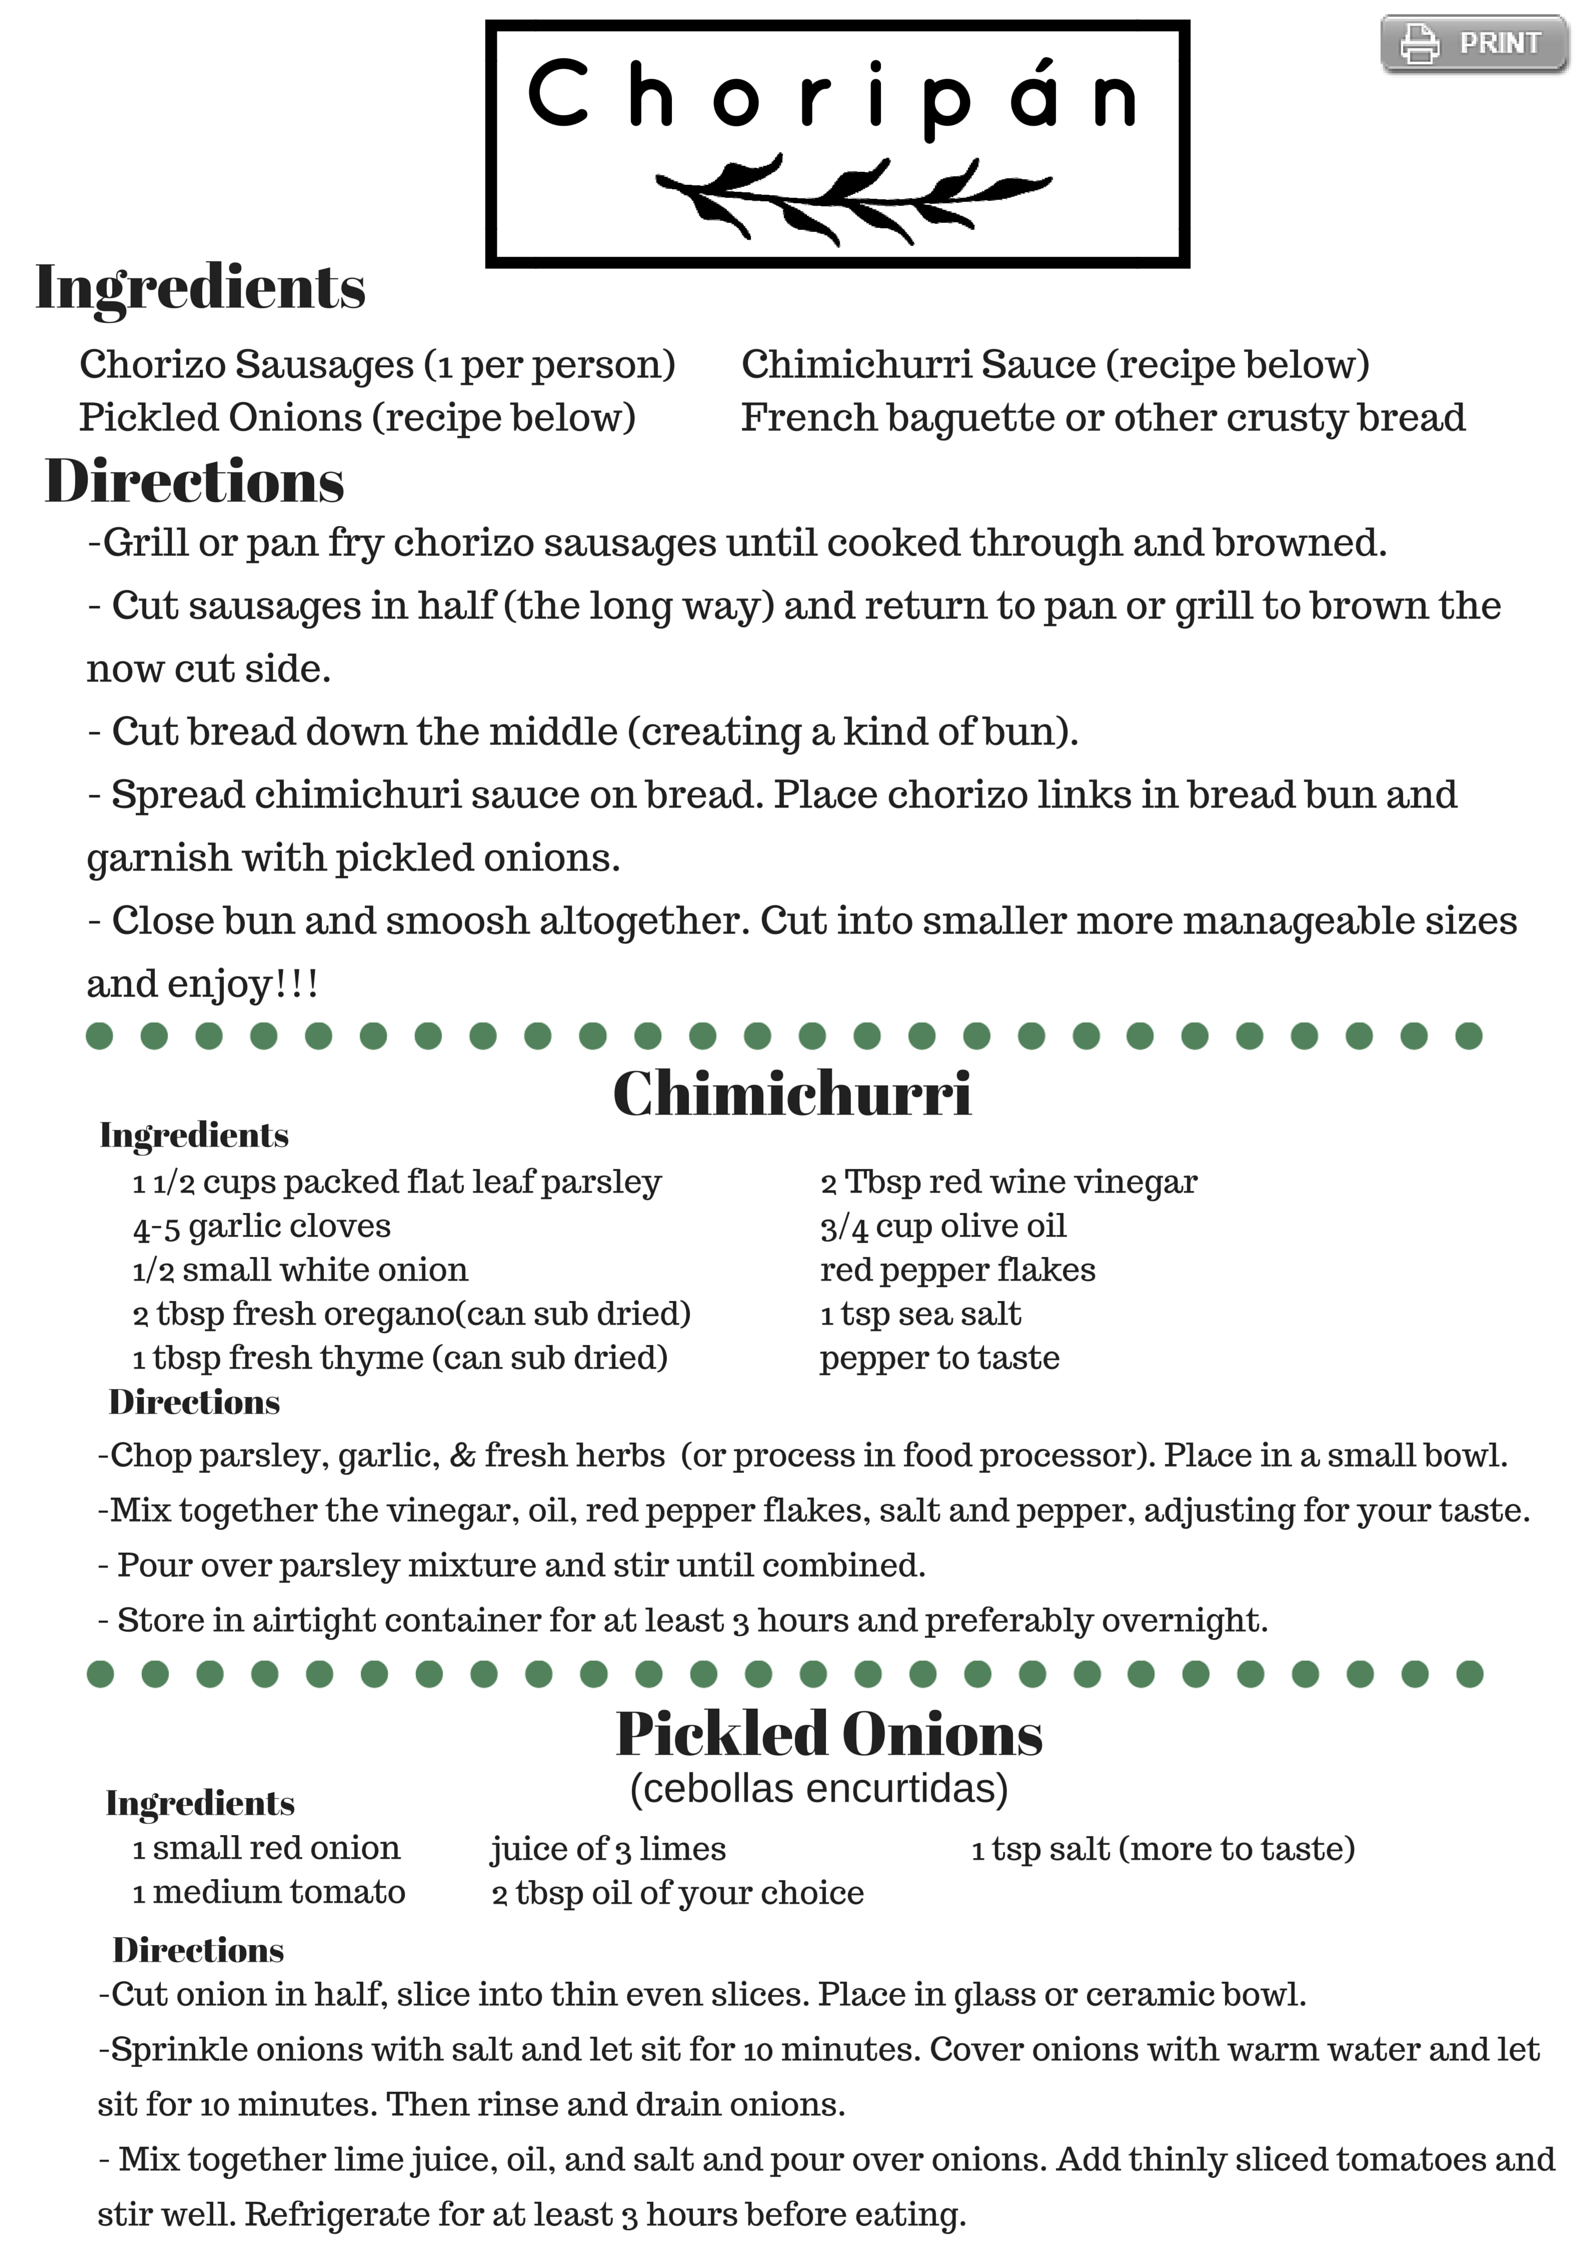
All Whisked Up! {Choripán Recipe}

 {Choripán}

Our fave (1)This week’s post is extra special!

Also a little longer than normal (bear with me)….let me explain!

Recently I became a member of a blogging group called Wisconsin Whisk. It’s a group of food bloggers in the great state of Wisconsin. The main goal is to connect bloggers in Wisconsin together with each other as well as with local producers, sponsors, advertisers to really nuture a community of support. As of right now, there are close to 40 blogs that are members! The majority are located around the Madison, Wisconsin area but there is certainly an impressive footprint of Wisconsin covered, from Eau Claire all the way down to Milwaukee and everywhere in between. Here is a list of members. Check them out! And if YOU are a food blog located in Wisconsin, consider joining!cropped-banny3_1A month or so ago, we had a first sort of ‘meet and greet’ event where some of us close to Madison got together to meet each other face to face and briefly cover what the goals of Whisk are and brainstorm ideas and discuss what members wanted to see Whisk help them accomplish.

One of the things we discussed was a sort of secret santa recipe swap if you will. The idea would be that if you wanted to participate you could put your name in a virtual bucket and you would be then be assigned another blog to go and research and find a recipe of theirs you wanted to try. You would make the recipe and document and photograph in your own style. Then those participating would unveil their “secret” recipes at the same date and time! We decided to call the event, All Whisked Up!

None of us know who is assigned our blog until posts are published (that’s today!).

My ‘assignment’ was to check out Kristin over at Everyday Celebrations.

Kristin describes herself as : “A former teacher turned wife, mom of 5, and author of Everyday Celebrations. She shares recipes and tips for celebrating life’s memorable moments and everyday celebrations. Some days celebrate a certain food, idea, or activity. Sometimes a day is set aside to remember or to increase awareness of a need. Each and every day should be celebrated by spending time with family and friends enjoying whatever time we are given”

Personally I absolutely love the positivity and gratitude that is practiced through finding the good in every day and having little celebrations all the time! Not to mention my admiration for a mom of 5 finding time to blog!

While looking through Kristin’s blog one of her posts and recipes really stood out to me. Kristin had a post highlighting when she made Choripan and I couldn’t help but try to make it myself.

What the hellllllz is choripan you ask? Ohhhh, sit tight, you’re gonna want to pay attention.

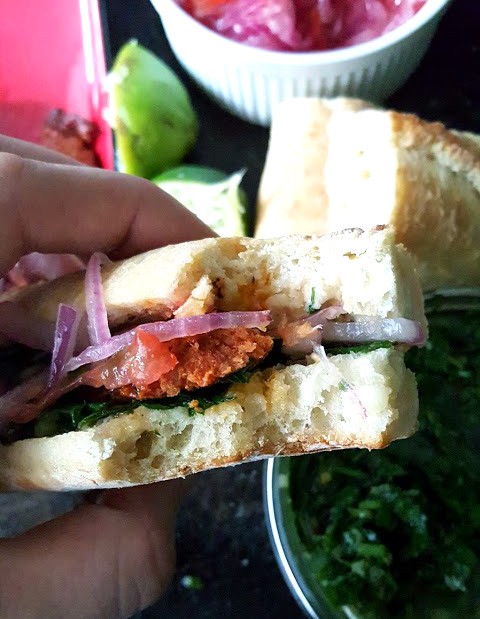
Super high level: Choripan is a type of sandwich that is incredibly popular in South America, most notably Argentina, Chile, Brazil, Guatemala, and a ton of others!

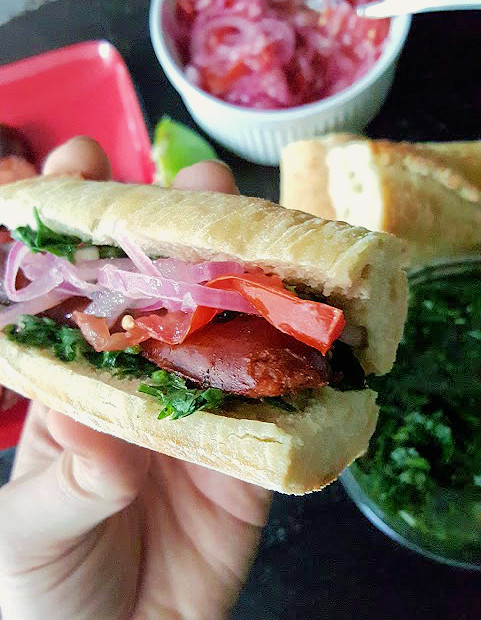
It’s name comes from a combination of it’s ingredients chorizo (chori) and bread (pan). It’s basically an fancy adult version of the american hot dog. Chorizo sausage grilled to perfection, split down the middle and served on crusty bread with chimichurri and pickled onions (that’s the most popular method).

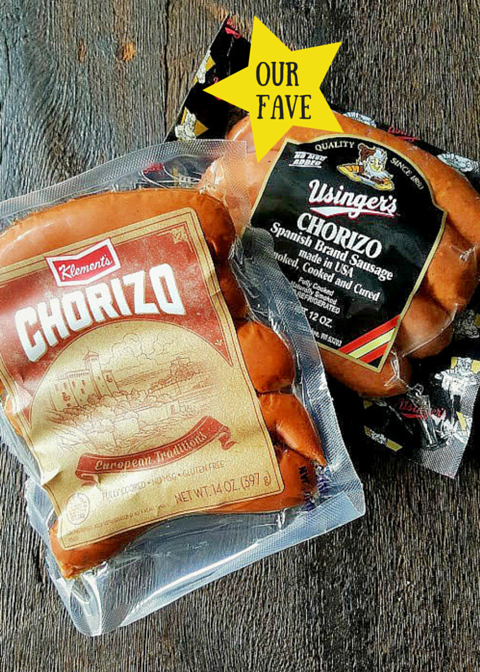
Through my research I found that while most recipes you will see call for Chorizo, not all chorizo is the same. Normally when someone says Chorizo you think of mexican chorizo which has that classic red color needs to be removed from it’s casing and ends up as ground meat. But there are many different kinds of chorizo. Spanish chorizo even has many version all depending on the locale. But most notably, Brazilian and Argentinian Chorizo is made with pork sausage which is very closely related to italian sausage and has similar flavors with more heat and less fennel flavors.

I looked at every.single.type. of chorizo that was available at my grocery store and tried to pick the one that was like what’s described above. I decided to give two of them try for comparison. Both were actually very good but I would pick the Usingers brand over Klements. Probably just personal preference but I like the consistancy (less crumbly, more sturdy) and the taste (more robust) better than the other. Both were great and totally tasty though!
Our fave

flag_of_brazil_heart_sticker-rd0816af7c62d425787003e4c3b1597b1_v9w0n_8byvr_1024I have a special place in my heart for Brazil (Brasíl  ❤ ) from my travels there when I was in high school. And actually had choripan while I was there! This brought back memories for me and the chimichurri was like a walk down memory lane for my taste buds. This post and recipe was fun to make and even more fun and delicious to eat.

Kristin is keeping her recipe for her chimichurri on lock down 🙂 so we made our own version but stayed true to her vision. So without further adieu, here is our take on choripán!
20151004_164217444444 ALWAYSSUMMER (1)
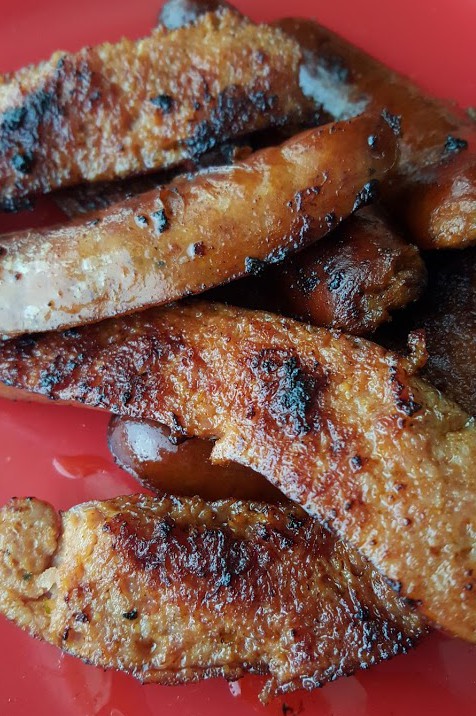
I pan fried my sausages
20151004_162423and made the chimichurri
20151004_163058
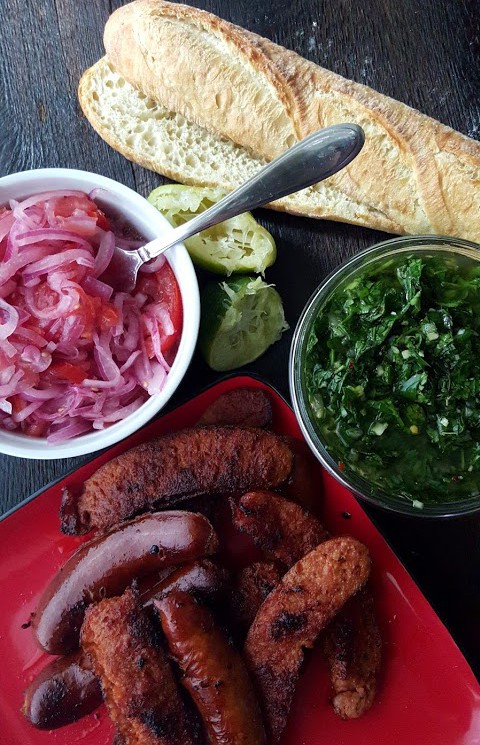
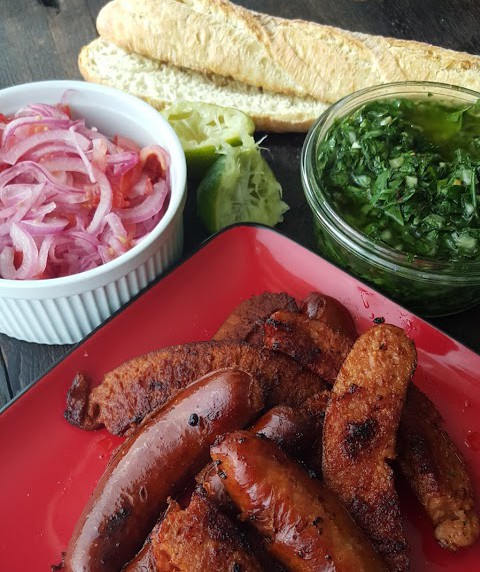
and the pickled onions & tomatoes
20151004_163226it was such a beautiful spread I couldn’t help but snap more photos!
20151004_163316
20151004_162912
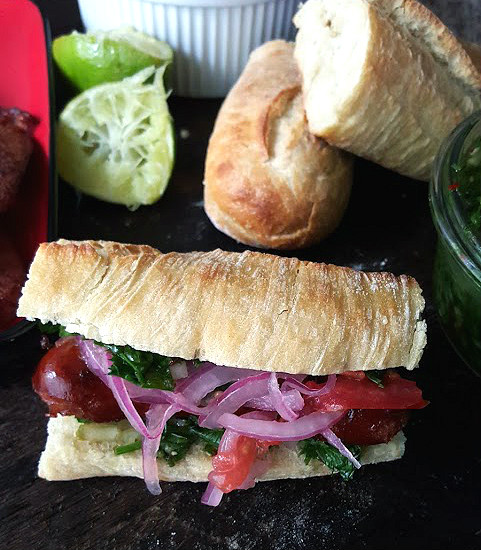
Then you put it all together!

I slathered both sides of the bread with chimichurri and then placed the sausage on top, garnished with pickled onions and tomatoes and squished together.
20151004_16393722222And take a big bite
20151004_16432533333My favorite part was definitely the chimichurri. I actually used the leftovers a few days later on a baked chicken. Just stuffed some under the skin of the chicken and rubbed it down all over. It seriously tasted so good. You might will have some left over of this so experiment, have fun, and find another use!20151004_162630
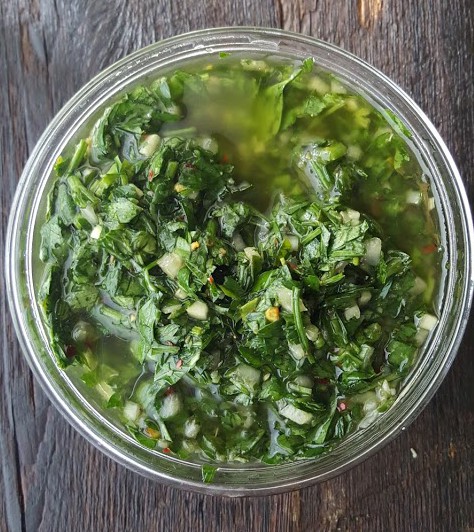
Whew! Done with pictures 🙂 This was really super delicious and Jake loved it, I loved it, so unique and flavorful. You should definitely give this recipe a try.

Also make sure to check out all the other blogs and member of Wisconsin Whisk! You can click on the little blue frog link down at the bottom to see all the other members who are participating in the recipe swap!

Have a wonderful weekend!!

xoxo

669058772380712020613

To view all the other All Whisked Up recipes, click here:


*Here is the inspiration post from everydaycelebrations

Advertisement

Breakfast Pizza

Breakfast Pizza

DSC_7881

Woot Woooooot it’s friday! Let me tell you- the first full week back at work after all the holiday shenanigans is H.A.R.D.

fo realz- I barely made it through. Especially since my teacher hubby-to-be had a snow/cold day off of school on Wednesday and it was sooo hard to wake up and go out in the -30 degree temperatures and drag my butt to work that day.

Jake and I have been KICKING BUTT on the wedding checklist this week! For those of you who may not know, I’m getting married this up coming June and I’m reaching the point I can no longer push things off until later and need to get them done now! Tuesday we shopped around for the guys suits and think we found what we are going to do, just need to try on a size (which they had to send to a location near us) on Monday and then most likely order those. Wednesday we shopped around for wedding bands and 90% sure we found what we like and will buy. We also created and added (some not all) items to our gift registry and I almost, almost booked a hair/makeup person for myself and my ladies for the big day of the wedding but even though I’d reached out to the person over a month ago (and she only got back to me a week ago) and we’d been talking all week, she wrote to me (5 hours after I told her I wanted to book her) that she’d just booked someone else for that day. Talk about frustrating!!! Seriously?!? how about a courtesy call or text saying “hey someone else is interested in your day and I just want to know your answer before I talk to this person. You know, since we’ve been talking for over a week”…….

I’m frustrated about it, mainly because a) that’s rude b) I’m super picky about make-up and hair and I’d FINALLLLLLY found someone willing to travel to my wedding place and who I thought was talented. So the search begins again. Buttttt- enough complaining! We got so much done this week and things are really coming together and I’m getting VERY excited for June to be here! Not mention my Italian adventure afterwards 🙂 I plan on sharing more wedding related ideas and details in the coming months buttt….before I do, I have to share this amazingly delicious and fast breakfast (or anytime of the day:) ) pizza with you!

DSC_7869

Breakfast Pizza
Ingredients:
– Pizza Crust (Homemade or store bought)
– 1 cup jarred Alfredo Pasta Sauce (I like this one)
– 1 package breakfast sausage
– 6-10 eggs
– 3/4 cup mozzarella cheese
– desired pizza toppings (I like mushrooms, peppers, onions, tomatoes….really anything!)

Instructions: 
– Preheat oven to 400 degrees (or whatever your pizza crust directions say)
– Cook breakfast sausage according to package directions until browned and broken into small-ish pieces. Drain fat and set aside.
– Crack eggs into a bowl and whisk to combine. Pour into a nonstick (or greased) frying pan and scramble. Don’t break into tooo small of pieces. Set pan aside.
– Spread the Alfredo sauce over the pizza crust and top with your eggs, sausage and whatever toppings your heart desires and finally sprinkle some cheese on top.
– Bake for about 10-15 minutes (depending on your pizza crust) until golden brown and crispy. Remove and let cool for about 5 minutes before digging in!

Isn’t that so easy? It’s the perfect quick thing to make for guests on the weekend too! Serve with some fruit and you’re like a rock star. My mom usually makes this a couple of times throughout the year on a Sunday morning when all the kids are home and there’s no way waffles or pancakes is happenin’

DSC_7890Also loving how these pictures turned out! Nothing beats bright natural light! Hope you have a fabulous weekend! Stay warm if you’re in the Midwest (brrrrrr so cold right now). Thanks for checking out the blog!

 xoxo

669058772380712020613

Homemade Ice Cream

Homemade Ice Cream

(No Machine!)

EDIT OF DSC_8164

Heyoooo! Happy Friday!

So I love ice cream- but it doesn’t love me or my intestinal tract. If you catch my drift……. so it’s definitely a once in a while treat. And Custard it pretty much a no go. Butttt I came across this recipe for home made ice cream with no machine needed?!? whaaaat? of course I needed to try that. And I’m so glad that I did. This is virtually limitless with possibilities I you could put so many different flavors into this!! My favorite ice cream of all time is Chunky Monkey by Ben and Jerry’s. TO. DIE. FOR.  This sort of reminded me of it but even better since it contains peanut butter 🙂 I can’t wait to come up with the next concoction for this recipe.

I couldn’t believe how much like regular real ice cream this was! Jake literally didn’t believe me that I made it. You need to give this a try and let me know what you think! Also please share your flavor ideas with me in the comments below! Here are some of my original thoughts:

  • Cookie Dough with caramel swirl
  • Coffee Ice cream with chunks of chocolate truffle
  • Peanut Butter Caramel Pretzel
  • Brown Sugar & Brandy
  • Strawberry Rhubarb Crisp
  • Pumpkin Pie
  • Creme Brulee
  • Cannoli

Clearly you can tell it’s taking a LOT of self control to have only made this recipe once. Take peek and let me know what you think!

Banana Pudding Ice Cream with Peanut Butter and Chocolate Fudge Swirls

Ingredients:

1 can (14 oz) sweetened condensed milk
1 pkg (3.4 oz) banana cream instant pudding mix
1 banana, sliced
2 graham crackers, broken into small pieces
2 cups (1 pint) heavy cream
1/2 cup peanut butter
1/2 cup hot fudge ice cream topping

Instructions:

1. Put peanut butter into a bowl, and place in the freezer for about 30 minutes to firm up. Meanwhile, whisk pudding mix into sweetened condensed milk. Stir in sliced banana and graham cracker pieces.

2. In a large bowl beat heavy cream until it resembles whipped cream(you may need an electric or stand mixer for this). Fold the whipped cream into the sweetened condensed milk mixture. Retrieve peanut butter from the freezer and pinch off teaspoon-sized dollops and drop into the ice cream. Next squeeze teaspoon-sized dollops of room temperature hot fudge topping into the ice cream. Gently fold it all together.

3. Store in a two-quart container and freeze overnight. Serve the next day, topped with whatever your little heart desires!

Here is a picture of it in it’s container ready for the freezer!!

EDIT OF DSC_8145


Thanks for checking out eat laugh craft. Don’t forget to check out our Facebook page, Twitter page, and find us on Pinterest! (Links on Contact page)

xoxo

669058772380712020613

Malted Milk Ball Creme Brulee

Malted Milk Ball Creme Brulee

EDIT of DSC_8379JPG

Hi All!

I can’t believe that today is AUGUST 1ST! I mean I love August as it’s my birthday month ❤  🙂 but holy crap! Summer flew by.

So today I wanted to share a seriously delicious (although not quite what I’d call low fat/healthy) special dessert. Who doesn’t love a good creme brulee? Actually I’m sure there are plenty of people who don’t. Buttttt from time to time it is a great treat. And of course who doesn’t love to use a mini blow torch in the kitchen 🙂 Seriously it makes you feel like a bad assssss.

These require a little bit of work and are pretty rich but they are great and an impressive dessert for a special occasion!

Ingredients: 

  • 2 cups heavy cream (you must use heavy cream)
  • 2 1/2 ounces milk (or dark if you prefer) chocolate, chopped
  • 2 tablespoons malted-milk powder
  • 4 large egg yolks
  • 1/4 cup plus 4 teaspoons sugar
  • Salt

Instructions:

  1. Preheat oven to 300 degrees. Bring cream to a simmer in a small saucepan over medium-high heat. Add chocolate and malted-milk powder; stir until chocolate melts and powder dissolves. Whisk together yolks, 1/4 cup sugar, and a pinch of salt.

  2. Whisk hot cream mixture into yolk mixture. Strain into a large measuring cup.

  3. Arrange four 6-ounce ramekins in a roasting pan. Divide custard evenly among ramekins, leaving 1/4 inch at the top.

  4. Place roasting pan in oven, and fill halfway with boiling water. Bake until custards are set, 60 to 70 minutes. Remove from oven and from water bath. Let cool. Refrigerate until cooled, about 2 hours.

  5. Sprinkle 1/2 teaspoon sugar onto each custard. Hold a small handheld kitchen torch(like this one) at a 90-degree angle 3 to 4 inches from surface of each custard, and move flame back and forth until sugar caramelizes and is deep golden brown, or you can broil until sugar caramelizes.

  6. The plain baked custards(no caramelized sugar) can be refrigerated for up to 2 days. Just take out of the fridge and follow step 5 to caramelize tops just before serving.

EDIT of DSC_8383

How freaking fun is that, right?!? It’s fun to do, fun to eat, and fun to look at too! This is more work than my average posted recipe but I hope you give it a try and come back to let me know how yours turned out!

Thanks for stopping by the blog!

xoxo

669058772380712020613

Apple Dumplings

Apple Dumplings

DSC_8401 copy

Happy Friday!

I’m back from vacation and I had an amazing time! Hopefully I’ll do a post soon with pictures and details 🙂 So last week was a week I was scheduled to pick up my CSA but as you know, I was on vacation. My aunt and uncle picked it up for me and I told them to help themselves and I would take whatever was left. So I don’t have my bi-weekly CSA post ready yet 😦 and might just combine with the next week. But in the mean time, feast your eyes (and bellies!) on these beautiful and delicious Apple ‘Dumplings’.

They require a little bit of work, but the outcome is worth it. I promise.

Ingredients:

    • 2 cups granulated sugar
    • 1 1/2 cups water
    • 1/4 cup butter
    • 1/4 tsp ground cinnamon
    • 1/4 tsp ground nutmeg
    • 2 cups all-purpose flour
    • 2 tsp baking powder
    • 1/2 tsp salt
    • 3/4 cup shortening or butter
    • 2/3 cup milk
    • 1/4 cup granulated sugar
    • 1/2 tsp ground cinnamon
    • 3 cups shredded, peeled cooking apples (3 to 4 medium); Golden delicious, Rome, Granny Smith or Jonathan apples

 Instructions: 

Sauce:

In a large saucepan, combine 2 cups sugar, water, butter, 1/4 tsp cinnamon and nutmeg. Bring to boiling. Boil 10-15 minutes; set aside (should be a liquidy syrup consistency)

Dough: In large mixing bowl, combine flour, baking powder, salt. Using pastry blender, cut in shortening or butter until pea-sized clumps of dough form throughout. Make well in center of dough and add milk all at once. Stir just until moistened. Knead dough on lightly floured surface 10 to 12 strokes or until nearly smooth- don’t over kneed it. Roll out to 12×10-inch rectangle (I found I needed a little extra flour and to wet my hands before this 🙂 )

Filling:

Combine 1/4 cup sugar and 1/2 tsp cinnamon; set aside. Sprinkle apples evenly over dough. Sprinkle with sugar mixture. Roll dough into spiral, starting from a long side. Pinch seam to seal. Cut into twelve 1-inch thick pieces (a serrated knife works best). Place in a 13x9x2-inch baking pan. Pour sauce over dumplings. Bake in a 350 degree oven about 50 minutes or until golden. Cool 20-30 minutes before serving.

DSC_8405 copy

Yeah- soooo good. And not drenched in a frosting or glaze, which I really really liked.

DSC_8411 copy


What do you think? Pretty right? Give it a try and come back and tell me how yours turned out! I love to hear from my readers.

xoxo

669058772380712020613